 |
SQUARING THE TUBE; Once you have all the parts to mount the optics for a Cass telescope the task is to fit them all together. Most of the parts come all machined and ready to use. The one major part that does not come ready to use is the tube which must be drilled to match both the mechanical parts and the optics. Both ends of the tube should be considered to see which is best for the end cap. The end should be fairly square. Otherwise the end cap will be tilted along with the focuser and thus the eyepieces will be tilted. To check for tube end squareness, wrap a strip of paper around the tube. The strip should have a straight edge and width greater than the diameter of the tube. By adjusting the ends of the strip to be even at the overlap the edge of the strip will be accurately square. Tubing is often cut commercially to an accuracy of one degree or about 0.017 inches per inch of tube diameter. This is about 3/16 inch for a 10 inch tube.
You can square the tube with much greater accuracy by hand. Mark the tube around the edge of the paper strip. File the end of the tube down to the line using a flat, coarse metal file. It does take some patient work but is not difficult and is quite accurate, often to 1/4th to 1/10 of a degree. In filing by hand, try to keep the work from vibrating. The tube should be firmly supported while you apply a firm, even pressure on the file. Us an 8 ot 12 inch long file and both hands. Move the file using the handle end and press down the file with the other hand. The tubing is usually hard to support so try to find a corner of the room to set the tube. If you want the tube standing up set the end of the tube on the floor and push against the two walls of the corner. If you want the tube on its side place the end of the tube against the wall at the corner while you push the tube against the floor and the other wall. Use your knee or foot to hold the tube so both your hands can be free to file. Use a blanket or piece of carpet to protect both the tube and the walls.
Bob's Note. The proper use of a file is that you hold the file handle (you need to have a handle on that tang!) with your right hand and put the left hand on top of the file at the other end of the file. The right hand pushes the file back and forth while the left hand applies pressure onto the file. Not too much pressure or you can break the file but you do need to apply pressure. The stroke of the file is at an angle to the direction the file is pointing in with a typical stroke with a 10 inch file of 1 inch width cutting on about 2 - 3 inches of the work. A firm even pressure is best with a firm even stroke. You also need to hold the file at the same vertical angle so that handle doesn't rise or drop as you make the stroke. Lift the file off of the work on the return stroke as it doesn't do any work in that direction but does wear the tops off of the teeth a lot quicker, thus destroying the file a lot quicker. Each file type has its purpose with different types of teeth doing different jobs. If you're not familiar with files, ask about the purposes of the different types of files. End Bob's Note.
MIRROR MOUNT; Regardless of what material the tube is made of, production problems limit the accuracy of the diameter and the wall thickness. The end cap has been accurately machined to minimize the problems of the less accurate tubing. Both ends of the tube should be considered to see which is best for the end cap in both roundness and accurate inside diameter. Fiberglass tubing can have variations in inside diameter from one end to the other. This is no problem if you simply select the end that fits best. Once the end cap is fitted into the tube the mounting holes can be drilled. Adjust the mounting screws so they are left sticking out about half way. With the tubing set on end insert the Cass mirror mount into the tubing. The mounting flange will slip in the tube until the mounting screws are resting against the end of the tube. Carefully mark the end of the tube at each screw location. Mark one screw location on both the end cap and the tube with a circle or arrow to indicate and index point. This keeps you from rotating the end cap to another position. Thus the position of each screw hole can easily matched now and later when the telescope 9is disassembled for any reason (cleaning, re aluminizing, etc.). This will make re collimation simpler.
Bob's Note. I usually don't put the screws on exactly the perfect locations around the diameter. however with commercial parts, the holes are already drilled and tapped for you. When you put a screw a bit off from where it should be, you will index the joint just as well. There will be only one position where all of the screws will come close to mating with their holes. End of Bob's Note.
After each screw location is marked on the tube remove the end cap, then use a square to extend the line on the tube. A square is also used to cross mark the line the correct distance from the end of the tube. Drill the holes in the tube making sure the tip of the drill doesn't slip off to one side. Now insert the end cap to make sure each screw hole lines up with the holes in the end cap. Now mount the primary mirror in the mirror mount. Be careful to follow the instructions supplied with the mirror mount for specific details related to the design of the cell. The back of the mirror should be fully supported to keep the mirror in the same position even though the weight of the mirror shifts position during normal telescope use.
Next, the edge supports should be adjusted to hold the mirror edge firmly. Reasonable pressure should not strain the mirror. If the mirror is not firmly held, it will shift from side to side during telescope use. The mirror clips are adjusted so they hold the mirror face. Pressure from the clip must be very light. It is very easy for the clip to cause strain and optical distortion in the mirror. Mirror clips hold the mirror in place only during the times the telescope is pointed below the horizon - usually only in storage and handling. Many experienced amateurs adjust the mirror lips with a sheet of paper between the mirror clip and the mirror face. After adjustment the paper is removed to leave a very small gap.
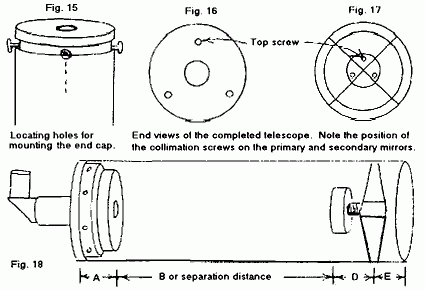
At this point the focusing mount should not be mounted on the end cap yet. Lay the mirror mount with the mirror on a table with the mirror facing up and the outside face of the end cap facing down against the table. The collimation springs should be fully compressed. Now insert a ruler thru the perforation down to the surface of the table. Read the distance at the edge of the perforation at the optical face. Call this distance A. Insert the end cap into the tube and measure distance A from the face of the end cap and mark the tube.
SEPARATION DISTANCE (B); Separation distance is measured from the primary mirror to the secondary mirror. It is determined by th optics and is usually given by the optical supplier. Mark distance B on the tube measuring from the distance A mark.
SPIDER MOUNTING: The next step is to mount the secondary mirror in the secondary holder. Be sure to follow the instructions supplied with the holder carefully. The Cass secondary should not be loose in the holder. Next, mount the secondary holder to the spider. It is important to keep the distance from the back of the secondary holder to the spider to a minimum. Cass secondary mirrors are often large and heavy. Mount the secondary holder with enough adjustment to allow moving the secondary a quarter inch away from the primary mirror. Normally with good layout this 1/4 inch distance is the maximum distance needed to provide full adjustment. Providing more adjustment will increase secondary overhang and greatly increases the risk of problems with secondary vibration and decollimation due to secondary mirror sagging out of position. Remember that a Cass secondary is a magnifier mounter a long distance from the focus. In a 6 inch Newtonian the diagonal is about 7 inches from the focal plane. In a six inch f15 Cass the secondary is about 28 inches from the focal plane. Even at the same magnification an equal amount of secondary vibration will show up as four times greater image motion in the Cass. Since the Cass is normally used at two to four times the magnification on the secondary vibration will also be magnified. If you allow +/- one inch to take up sloppy errors in layout there will be a good chance that the finished telescope will have excessive secondary vibration. Use well designed Cass secondary holders and spiders. A little careful layout work avoids troublesome telescope vibration later on.
Now measure from the face of the secondary mirror to the centerline of the spider. Call this distance D. Mark distance D on the tube, measuring from the distance B mark. Use the long strip of paper to extend the line around the circumference of the tube. This is the spider center line. Divide this line into four equal spaces and drill the spider mounting holes.
ASSEMBLY; Now the focusing mount can be attached to the Cass mirror mount, using focusing mount extensions if necessary to take up execs back focal length. The Cass baffles and index can be attached at this point also. Mount the primary mirror mount assembly and the spider assembly to the tube and rough collimate the optics. Errors in separation can cause reduced image quality and very large shifts in the back focal length. Because it is difficult to measure separation distance B after assembly it is usually best not to attempt direct separation measurements. Instead the separation adjustment and the back focal length adjustment will both be made at the same time. The higher the magnification in the Cass secondary the larger the back focal length shift will be. For a 1/16 inch error in separation with a 3X secondary, the focal plane is shifted 9/16 inch; with a 4X secondary the focal plane is shifted 1 inch; with a 5X secondary the focal plane is shifted 1 9/16 inch. This can easily cause problems getting the focuser to focus all eyepieces as well as deterioration in image quality.
By direct measurement and adjustment of the back focal length to the optical specifications the separation distance is adjusted to high accuracy, +/- 1/64 inch, for optimum optical performance. To check the back focal length, point the telescope toward the moon. Use a tape measure with end hook to measure from the primary mirror face down the focuser tube. The star diagonal should not be in place. Now slide a ground glass or waxed paper along the tape measure until the moon is sharp and clear. The distance at the point of focus on the tape measure is the actual back focal length. Compare to the optical specifications. With a 4X secondary, adjustment of the back focus to +/- 1/4 inch will at the same time adjust the separation distance to +/- 1/64 inch. If you are suing a Cass baffle tube the separation should be adjusted before the baffles are mounted in the perforation or measure the back focal length with the baffle tube in place. Hook the end of the tape measure on the end of the baffle tube then subtract the actual baffle tube length from the focuser measurement. If a large error in back focal length is found, adjust the separation at the spider. If the back focal is too long then the separation is too close together so move the secondary mirror away from the primary. If the back focal length is too short then the separation is too far apart so move the secondary mirror toward the primary.
End clearance distance B is a matter of choice, usually at least 2 inches, often 3 inches, but sometimes as much as tubing diameter (7 inches for 7 inch tubing) to reduce secondary mirror viewing.
The appropriate tube length required can be found in the chart below. In many cases the tubing need an inch or two shorter than given in the chart. Keeping the tube length to the minimum required should be done only with all the parts in hand. Exact tube length depends on the exact separation distance, mirror thickness, etc.
For a 4 1/4 inch Cass the tube length = separation distance B + 6 inches
For a 6 inch Cass the tube length = separation distance B + 7 inches
For a 8 inch Cass the tube length = separation distance B + 8 inches
For a 10 inch Cass the tube length = separation distance B + 9 1/2 inches
For a 12 1/2 inch Cass the tube length = separation distance B + 11 inches
|