 |
|
To get acquainted with the collimation perspective, point the telescope toward a well illuminated wall or ceiling, preferably light colored. Look into the eyepiece holder without an eyepiece or sight ring or other collimation devices. We will get to collimation device later but for now it is easier to understand what you are looking at without them. In more or less the center of the view you see your eye looking into the telescope. Keep your eye back from the eyepiece holder four or size inches. If the room is not well lit not enough light will be reflected from your eye into the telescope.
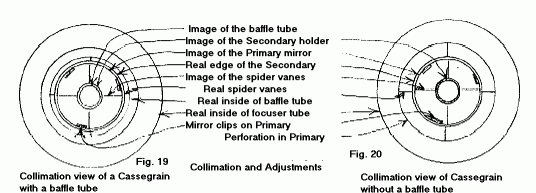
Around your eye will be seen the reflected image of the baffle tube if you are using them or the reflected image of the perforation. Please note that if a mirror star diagonal is mounted in front of the primary mirror so the Cass focuser can be mounted on the side of the tube (like a Newtonian) you will see the image of the edge or the star diagonal mirror around your eye. Around the image of the baffle tube or perforation is the reflected image of the secondary holder. It is often very helpful to paint a white dot on the retaining rim of the secondary holder. This helps identify the secondary holder with relation to the adjusting screws (usually "top dot or "bottom" dot). Since you can see both the real secondary holder and its reflected image you probably will ask how one is distinguished from the other. Almost all Cassegrains have a secondary with a negative focal length, like a Barlow. Negative focal length mirrors and lenses make objects look smaller. When you look into a Cass telescope and see both the real secondary holder and its reflected image they will appear identical except the reflected image is the smaller of the two. The same is true with all the other pars of the collimation view.
It is easy to lose track of what you are supposed to look at during collimation and end up looking at the wrong reference part. When that happens you are most likely to do the collimation no good and be frustrated because it will appear the collimation efforts are not doing what they are supposed to. At this point you should pause a bit, check to see what you are supposed to look at, then identify what you are looking at in the collimation view.
Around the reflected image of the secondary holder is seen the real secondary holder. Between the real secondary holder and its image are the reflected images of the spider vanes. The image of the primary mirror edge is seen near the edge of the real secondary mirror - not the mirror clips. The real spider vanes extend from the real secondary holder to the inside of the tube wall. With a baffle tube in place the real spider vanes may be difficult to see. Move your eye off to one side to peek around the baffle tube a bit. Most of the telescopes internal parts are painted flat black, making it a bit difficult to tell one part from another. The upper end of the real baffle tube is seen near the edges of the real secondary holder.
If the baffle tube does not use flock paper or a rear baffle stop the inside wall of the baffle tube will appear illuminated even though it is painted flat black. This is reflection down the baffle tube. Because many people do not expect this reflection the inside of the baffle tube is not recognized. The baffle tube is directed toward the light source so some light will enter the baffle tube directly without reflection from any of the mirrors. Flat black paint has a limited effect in reducing this reflection. Most parts inside the tube appear very black or brightly illuminated. The inside of the baffle tube painted flat black but without flock paper or rear baffle stop will appear light gray. Around the real perforation and/or the real baffle tube the back of the primary mirror can be seen. If the light coming into the telescope is bright enough you may be able to see thru the aluminized coating of the mirror.
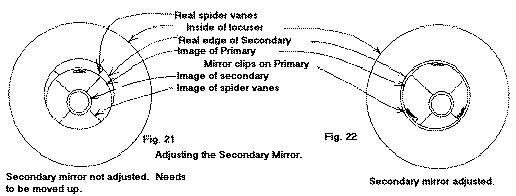
To begin collimation, start with adjusting the secondary holder. Although the collimation view has a lot of things to see it is best to pay close attention to the real edge of the secondary mirror (or the inside edge of the secondary holder) and the image of the primary mirror (note mirror clips). Try to ignore everything else you can see. (It is also helpful to start collimation without a sight ring or other collimation device. It is easier to recognize what you are looking at without them. Collimating the secondary mirror means you adjust the screws on the back of the secondary mirror holder. Rotate the telescope so one adjustment screw is on the "top" or "bottom" so the other two screws are the "left" and "right".
While you are adjusting the secondary mirror the effect is seen in the position of the image of the primary. The position of the secondary will probably not be centered in the middle of the image of the primary mirror. The image of the primary mirror is to appear centered within the real edge of the secondary mirror. The mirror clips should appear the same size. After rough collimation of the secondary to where it looks close, now you should put a sight ring into the eyepiece holder and make finer adjustments. You will no longer be able to see your eye. If you lose track of the real edge of the secondary or the image of the primary, remove the sight ring to be sure you are looking at the right things.
 |
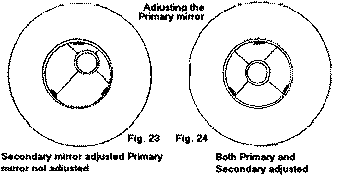
Now adjust the primary mirror. Again you probably will find it easier to start adjustment without the sight ring. Look at the image of the primary mirror and the image of the secondary (edge of secondary mirror or edge of the secondary holder). Note that both are reflected images and now the secondary appears smaller than the primary. Try to avoid looking at the other parts. The image of the spider vanes cross the image of the primary mirror. After the primary mirror is adjusted the vanes seen as a reflected image will then appear to be of equal length. But now they appear to be very unequal in length. As before, rotate the telescope so the white dot on the edge of the secondary holder retaining rim is at the "top" the same as one of the collimation screws on the mirror mount. The remaining collimation screws are then the "left" and "right" screws. The idea is to center the image of the secondary within the image of the primary. If you see the secondary it should move toward the "right" then loosen the "right" screw by turning it counterclockwise a bit. It is usually best to adjust the "left" and "right" screws first before making the final centering using the "top" screw. When the coarse collimation appears close you can insert the sight ring for closer adjustment. Again you should make sure you are looking at the right parts to judge collimation. Now the collimation of the optics is near completion it is easier to adjust the primary mirror when the secondary mirror should be adjusted or vise versa simply by looking at one wrong part. And because a Cass telescope needs only rare adjustment you probably never will get so familiar with the collimation view that deliberate caution is not needed to be sure you don't lose track of what you don't lose track of what you should look at.
 |
After the optics are collimated the real image of the baffle may not centered with the real edge of the secondary mirror. Baffle adjustment is limited because it usually depends on th accurate perforation of and the baffle position enclosed within the telescope making any built in adjustment difficult to reach. For commercial baffles follow the instructions as best you can. Long baffles tend to have the most troublesome problems in alignment. In some serious cases you can add a 1/8 inch layer of cork to the upper end of the baffle. This reduces the baffle inside diameter by 1/4 inch,. Recalculate the baffle length then cut down the baffle length to reduce effects of off-center of crooked perforations. Alternatively you can reduce the baffle tube inside diameter with a paper stop blued to the upper end of the baffle. The advantage of this paper stop is the hole in the center can be offset to put the center of the stop in the optical center even though the baffle tube is off-center. A tight fit between baffle tube and perforation leaves no adjustment. Commercial Cass optics generally have the perforations a bit oversize to avoid most of these problems. If you are cutting your own perforation be careful that it is centered and straight. Too often amateurs consider the perforation nothing more than a hole to let the light thru the primary until a baffle tube is mounted in it only to discover the perforation accuracy is needed for alignment. An undersized perforation by a few thousandths of an inch means the baffle tube may not fit in.
At this point you can have collimation with physical edges of the optics but optical centering may be off a bit. Further, more precise collimation is possible using a real star and a Ronchi Grating. An expensive ruled grating is not needed, only an inexpensive film replica.
Bob's Note: Willmann-Bell has very nice film gratings available for quite cheap. You need to get their catalog to know the number but you can also call them. You will need to make your own holders for the Ronchi Grating and the sight ring yourself. Old style 35mm film cans are excellent quick holders for the Ronchi Grating and a small hole in the end does well for a sight ring or tube.. When using a Ronchi Grating on a star, adjust the position of the telescope so that you see a large white image in the grating and refocus until the grating lines appear. You are basically seeing the image of the primary as you have no eyepiece in the focuser and thus the light is not turned back to a parallel beam but rather defocuses with distance from the focal plane. The Ronchi Grating will affect the image as it nears the focal plane and when at the focal plane, will act just like a knife edge on the image of the star, thus providing both a grating where the lines on a perfect telescope will be parallel and, at the focal plane, will do a knife edge test where the image will evenly dim as it would with a spherical surface will in the Foucault test. End Bob's Note.
Coulter Performance Test Kit includes both a sight ring and a film type Ronchi Grating mounted in eyepiece type holders. With the grating the eyepiece holder you first rack the focuser "in" all the way then back out until for dark bands appear. A fully adjusted set of Cass optics shows the dark bands as being straight with equal widths of light and dark spaces. Optics needing more adjustment show the bands as being fatter or thinner in some places on one or two of the bands will be curved while the others are straight. Make small adjustments is the secondary, or primary, or spider centering. Look for improvement in the bands. If there are none, change the adjustment back to about where it was and try adjusting something else. Normally it is best to check the spider centering first since spider centering will change both the primary and secondary collimation along with it. Tighten one spider vane after loosening the spider vane on the opposite side. If the spider centering must be changed, it should be before you get collimation of the primary and secondary finished. The Ronchi Grating shows astigmatism with poorly adjusted optics. Grating picture showing various astigmatism effects are found in the instructions with the Performance Test Kit and in the section of Amateur Telescope Making - book one, pages 264 thru 270.
 |
Please note: Baffle tubes do not have a unique optical center so little done to the image quality if the upper end or the lower end of the baffle tube is off-center by a small amount as the light cone is only vignetted by the baffle. Small errors in baffle tube centering are typical while perfect desirable as it may be, is somewhat rare. A practical compromise is to errors in baffle centering at the upper end of the baffle tube. The left above shows what could be called a partial eclipse of the primary mirror by tube. This should be avoided but also can not be corrected by adjusting a stop upper end of the baffle tube. If the baffle tube can not be adjusted because tight perforation in the primary you can, in most cases, shorten the baffle tube use a stop at the upper end of the baffle tube. If after mounting the baffle (in some cases after months of telescope use) you decide the amount of reaching the eyepiece should be reduced a bit more, you don't have to get a baffle tube. Simply add a strip to the upper end of the existing baffle tube. this does not even require disassembling the telescope, only reaching past the to the end of the baffle tube with the paper stop to be glued in place.
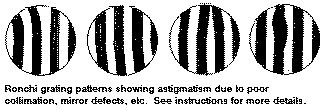
Bob's Note: Astigmatism in the Ronchi image (when the lines are wider at one end than the other) is generally from errors in the pointing of the primary and/or secondary. If you have a spherical primary, the problems will all be in the secondary as in a Schmidt Cass design. Errors in the lines being curved, as in spherical aberration or in the image of a test on a parabola on the Foucault Test Stand, are generally in errors of setting up the distance between the primary and secondary. This can be quite unexpected, especially with a home made system, as the mirrors weren't exactly as planned. Needless to say, if you do change the separation distance by moving the secondary, you will need to go through the adjustments of the mirrors to insure that you have the telescope properly aligned. Don't forget to check the Ronchi lines in several directions as, while the Fig. 27-30 show the lines vertical, your errors in alignment are not necessarily that way. Also avoid the rotation of 90 degrees as this can end up showing apparently valid results in the Ronchi test. Do the test several times with maybe 30 degrees different each time as a good value. Baffle tubes are not part of the optical system so their adjustment does a different thing - namely blocking light from entering the eyepiece without going thru the entire proper light path. With the light baffles in place, you should not be able to see directly out of the telescope from any point viewed when the focuser is fully racked in. If you do see past the secondary, it is wise to put a stop plate at the end of the baffle tube. End Bob's Note.