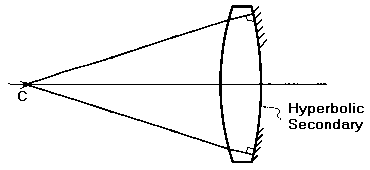
Testing through the back surface for other Conic Constants.

Here are the various tests that I've seen on doing convex surfaces for a Cassegrain secondary:
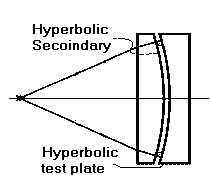
 The first test mentioned is fringe testing against a test plate. This test is fairly easy to do as it is an interference test between two surfaces close to each other. It has the advantage that you don't need a good quality of glass for the secondary nor a lot of other optical surfaces to do this test.
The first thing to do is to make a test plate (a test plate which is nothing more than a concave surface of what you want to do in the convex secondary. In this case of the right surface shape of a hyperboloid and then testing the desired final surface against the test plate for matching surfaces. See the articles on making flats for details on making surfaces match as the same processes are used in this test.
The light source for this test is easy to make as it is nothing more than a regular fluorescent light with a cheap green clear vinyl sheet in front of the light. Even with just the fluorescent light, you can get fringes showing but you end up with violet and green fringes which will be distracting to you. The fringes will show up very nicely when the glass surfaces are clean and dry. Getting a few straight lines is the object here and that is when the surfaces match. Bulls eyes are indications that the surfaces don't match and, depending upon the direction of the travel of the lines when you press on the center of the glass with the lines approaching the pressure point being the two surfaces are further apart in the center while the lines going away from the pressure point indicating that the pressure point is the place where the surfaces are closest together. Getting the fringes down to just a few or finding the bullseye can be a bit difficult in the beginning but peserverence will win the day here. For reference, each light/dark line is a half wave of distance between the two surfaces (plus all of the whole waves of spacing that you don't see). The lines can be photographed and run through a program like FringeXP (available on the web) just like an interfrogram would be tested.
The nice thing about this test is that it doesn't require any optical glass as plate glass will do very nicely for the surfaces and no large optics are needed to test the surface. The test plate is easily tested with the Foucault tester with the distance for the zones being multiplied by the Conic Constant (K = -e2) to get the right travel distance for the shape desired. TEX or other Parabolic surface data reduction program (with the right reduction of the numbers obtained) will do very nicely for telling you how good the surface shape is.
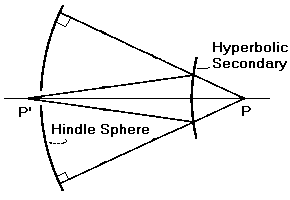
 The next test to be described is the Hindle Test. This test requires a concave mirror approximately the diameter of the primary mirror that the secondary is to be used with and approximately twice the curvature of the primary mirror. For example, if you have a primary mirror of F3, you will need a spherical mirror of about F1.5 with a hole in the middle to properly do the test. The thing that will make this Hindle sphere not that difficult to do is that you can live with a bit of a defect in the edge as you can adjust the test to eliminate the edge from the light path. You can use a smaller mirror if desired but you will lose the ability to test the more central areas of th secondary mirror.
The purpose of the large spherical mirror is to reflect the light back to the secondary under test and thus put the focal point of the light behind the secondary so it can be tested at the two focii of the surface - as seen elsewhere, a hyperboloid has a focus on each side of the surface and, unfortunately, the rear focus is not available for viewing while the front focus is available and is where you put the knife edge or Ronchi grating for the testing of the secondary. The test is a null test which means that the secondary, when properly figured, will act just like a spherical mirror in the Foucault or Ronchi test - the entire surface will gray out evenly.
The first thing is to determine where the two focii are on the secondary and you place the center of curvature of the Hindle sphere at the one focus behind the secondary surface and the focus in front of the secondary surface will be somewhere behind the Hindle sphere where you test for the null. The hole in the Hindle sphere needs only to be big enough to see the entire secondary mirror from that focal point.
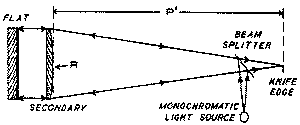
 This test was written up in Sky and Telescope Magazine back in 1957. It, and the next test do depend upon the use of good glass for the secondary mirror. This is because you have to look through the glass in order to see the surface of interest. As shown to the left, the secondary is placed at the front focal point from the light source and KE and the light goes through the secondary and is reflected off of a flat mirror. A beam splitter is used as you do need to see the image on the axis otherwise you will be introducing astigmatism into the surface from the source and KE being at the focii of an oblate elliptical shape. The front surface of the secondary is the surface towards the light source. The back surface needs to be a fairly decent flat surface (better than 1/4 wave) but a slight curvature will make the actual hyperboloid surface be off by only a slight amount which can be corrected for when finishing the telescope as any error in the secondary shape will show as spherical aberration in a complete telescope. It is nice that just moving the secondary in or out a little will correct that spherical aberration without any problems.
 should be flat to less than 1/8th of a wave, the polish need not be perfect.
For a Cassegrain whose secondary is located at distance P inside of the primary focus, the secondary's back focal length (being where the system focal plane is) being P', the following relationships are well known:
Radius of Curvvature of central zone:
The Norman test uses the refractive index of the glass to determine the actual surface shape that is needed. It is a bit restrictive in this aspect. Different colors of light and different glasses are used to gain different variations in the amount of the hyperboloid. You don't use white light in this or the next test otherwise you won't be seeing the proper shape nor seeing a good null indication.
For example, if the desired eccentricity is 1.57, then the proper glass to use and the light wants to be the D line of the spectrum. If you need a higher e value, you need to either use a different light or a different glass. The value of the eccentricity desired on the hyperbolic surface is essentially the refractive index of the glass at the color tested.
The last thing in this test is that the back surface of the secondary needs to be a flat surface of better than 1/4 wave. The test is a null test and can easily be done with the Foucault tester or Ronchi grating.
The problem with this test is that it only allows a small range of eccentricity values otherwise the surface can't be tested as a null.

When doing the figuring, you need to do both surfaces at the same time and the reflection surface is the surface that needs to be figured to better the null of the test. An iterative procedure needs to be done on the glass as you won't get the right surfaces the first time around. This isn't as difficult as it seems as the initial testing will show huge errors and working back and forth between the two surfaces will gradually bring the null out of the mess.
In addition to the testing of the scope by this method is replacing the eyepiece with a Ronchi grating and viewing the resulting lines produced by the grating on the image. Again, this test is an out of focus image as the Ronchi grating wants several lines to be viewed at the same time. If you put the Ronch grating at the focal plane, you end up doing the basic Foucault test (one of the interesting things of history is that Leon Foucault probably never did the test named for him - he tested ellipses and then finished up by looking at a very distant light source for proper correction to a parabola!) with one edge of the Ronchi grating. Needless to say, the lines of the Ronchi grating image should be perfectly straight for a perfect telescope.
I'm not going to go deeply into this test as it is a test which requires a lot of images and description to do properly but I will note that the test is basically looking for an out of focus ring (the secondary occupies the center of the image so it will be black as it is blocking that part of the image) with an even brightness which will indicate that the light from the star is being evenly distributed across the cone of light to/from the focal plane, depending upon whether you do the test inside/outside of the focal plane. This test is somewhat subjective as the tester needs to be sure that the brightness is even across the image. Moving the eyepiece in and out will assist the eye in making this evaluation and a high power eyepiece is prefered as you get to see the image close to the focal plane of the telescope.
The big difficulty with making Cassegrain telescopes is that there really hasn't been that much info on the construction of these designs. I hope that with this set of pages, I'll be seeing a lot more telescopes other than a "new" variation of the Dobsonian telescope.
I haven't described making Schmidt. Houghton, Maksutov or other corrector systems as these are just methods of making a spherical primary viable for the Cassegrain design. All of these correctors, in some way, modify the waveform going into the telescope so that when the light hits the primary, it comes off of the primary in the proper form so that the corrector/primary system looks like the proper parabolic or hyperbolic shape that is needed for the design. The nice thing about correctors tho is that they will get rid of a spider (in most cases) so that the star images will not have those diffraction spikes that spiders produce.
Have fun with glass and make a Cassegrain tesescope!