DAFT
(Diffraction Assisted Figure Testing)
by Wm. S. Maddux
The Problem:
From the early days of American amateur telescope-making in the 1920s, the Foucault Test has been recognized as less than well suited for quantitative testing of a mirror's figure. In my Fourth Edition, Eighteenth printing, 1967, copy of "Amateur Telescope Making (Book One)", in Part II, there is a reprint of the seminal book, "The Amateur's Telescope", by The Rev. William F. A. Ellison. In his Chapter VI, "Zonal Testing", p.98, Ellison advises (referring to paired, horizontally arranged, zonal apertures in a mask placed before the mirror in the center-of-curvature Foucault test-setup) as follows:
The observer must practise his judgment in deciding which of the two is darker, as in reading a Bunsen's shadow photometer. If both are equally dark, the knife-edge is at the focus of this zone... (Italics and spelling are Ellison's.)
Thus, the article here is an intention to solve the geometrical problem that exists with the regular Foucault testing, namely that of determining the relative dimensions of a particular solid figure, e.g., a portion of a paraboloid of revolution, by estimating relative light intensities (photometry) using the human eye to compare spatially separated illuminated areas (an unfavorable circumstance for precision in visual photometry) and to judge the attainment of that equality of brightness as a function of knife-edge distance along the axis of the mirror. After determining the equality of brightness, and determining the distance from the starting point, relating that radius to an expected (calculated) value for the desired conic.
A Different Approach:
Back in the 1960s, while making components for a color schlieren system to use in biological research, I (Wm. S. Maddux) discovered a fairly simple and more directly geometrical alternative method to measure zonal radii near the center-of-curvature (c-of-c) occurred to me. I improvised a trial setup, and made a few empirical tests of feasibility, then postponed further work on it, " ... until after I had dealt with other, more pressing, matters." Now, nearly 40 years later, I've revisited the idea, with a view to writing up this description, in case it might prove of interest to some currently active ATMs.
There have been many attempts to find better ways to survey and control the progress of a mirror as it is being shaped, and to rate the quality of the final result. This test is one simple method of determining the ROC difrerences of the various zones of the mirror under test.
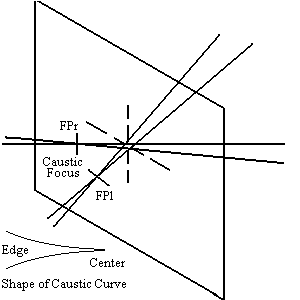 Consider one of the more precise methods, the Gaviola Caustic Test, as first made known to many ATMs in the mid-1950s, (by Irvin Schroeder, in Book Three of the Scientific American ATM triad.) For a beginning ATM, or for those without access to a good workshop, the Caustic Test's need for a rather precise two Cartesian coordinate measuring apparatus may be a bit daunting. What is the worst thing with the Caustic Test's promoters is the advanced workmanship shown with the equipment that the promoters have used. Thus, those paired orthogonal measurements indicating the caustic curve of the actual focus of the zones as used in the caustic test are only one possible path to the ATM's testing goal of finding the shape of the mirror. Since the location of the common crossover point on the mirror's axis for the two cones of light from horizontally paired zonal mask apertures, shown in the image to the right and if known to sufficient precision, provides enough information to determine the slope of the mirror at the zone being investigated. This point is the point at which the Foucault test is supposedly measuring the shape of the mirror. The question then arises, how might we conveniently locate the crossover point with sufficient precision without a lot of delicate measuring of the caustic curve? The knife-edge of the Foucault test is insufficiently accurate for that purpose as the darkness of the mask aperture is a very subjective thing. The traditional method in the Caustic Test is to take a wire and use it to obstruct the image of the pinhole being returned. This again is a bit subjective as, while the minimum can sort of be found, that minimum is often somewhat broad in its postiion.
If you think of each Couder Mask aperture as delimiting a small reflecting telescope's primary mirror, which images the pinhole near (remember that the pinhole is actually below the center line of the mirror's axis) the C-of-C as its object, which the telescope brings to a primary image focus near that pinhole. If the object/source is displaced a small amount vertically, the pin hole's image can be accessed for examination with an ocular magnifier near the lighted pinhole's location. The setup will still provide a projected normal to the mirror's center, as its vertical plane of reflection intersects the horizontal plane of the test along a line corresponding to the mirror's axis of symmetry. This is the normal setup with the slitless version of the Foucault Test as the Light Source is directly below the returned image, with the slight astigmatism produced by the method showing only in the vertical direction and none in the horizontal direction where the testing is done.
For each zonal aperture, we will effectively have a small aperture, very large length-to-diameter-ratio (100:1 or greater) reflecting telescope, focused on a small-diameter bright object. Although there is no need for a Newtonian secondary mirror and its spider support to enable use of an microscope, suppose that we nevertheless install "wire support spiders" at each mask aperture. The small bright source's near-focus images will then show something resembling a Newtonian reflector's familiar diffraction spikes. Furthermore, if the "wiresz" are in a bilaterally symmetric arrangement crossing on the center of the aperture as the spider of the Newtonian secondary's support, these spikes can be used to visually determine the centerline of each light cone more precisely than if we try to estimate the centers of the somewhat defocused small diameter light-source's images, absent such spikes. (Human astrographic-plate measurers have traditionally used diffraction spikes to get better fixes on the bloated star images of the photographs.)
More importantly, as we shift the focal plane of the microscope longitudinally near the crossing point of the cones of light from the zonal apertures, with suitably distinctive patterns of wires and hence distinguishable diffraction-spike patterns, we will be able to easily recognize the direction of change required for feedback to find the crossing point of the two beams, and thus to find the longitudinal location of their transverse plane of intersection (by their symmetric superposition) more easily and more exactly.
(The diffraction rings from a small, circular source-aperture may sometimes be used to see superposition, but lack of any feedback-direction information makes it more difficult to set precisely. However, when observed, symmetrical ring-alignment may lend confirmation to our spike-mediated null determinations.)
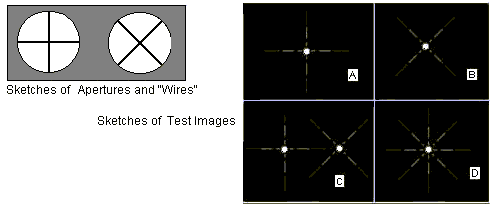 In Figure 1, is a sketch of the two mask-apertures equipped with cross wires. Note that one is vertical/horizontal and the other is at 45 degrees left and right and that the apertures are round rather than the regular arc of the Couder Mask used with the Foucault Test. Below that are stylized representations of the images produced by the left aperture (A)and by the right aperture (B). In (C), the appearance of the images in a plane transverse to the mirror axis somewhat inside crossover is shown. (Outside crossover, the [B]-image would be to the left of the [A]-image.) Their symmetrical superposition at crossover is represented in (D) which occurs when the two images overlay each other at the focal point of the curvature of the mirror at the locations where the apertures are..
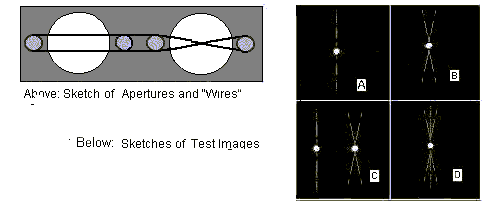 Figure 2 shows one possible modification of the "wire" arrangements, which can enhance the setting precision, as illustrated with the 4 images, [A] with the left aperture, [B] the right aperture, [C] with the two away from the focus position in the scope and [D] with the two apertures at the focus position.
Implementation:
General:
As usual, a sturdy mirror test stand with the typical tilt adjustments to direct it in the vertical and horizontal directions at the light source and microscope will be needed. Your standard Foucault tester parts will work just fine as you already know how to adjust that stand to point the returned beam to the correct point to see the Foucault image. All you have to do is use a pinhole and mount the microscope in place of the knife edge. Either basic style of knife edge movement (rotating about an axis or sliding side to side) of the tester will work fine as any tilting of the test head parts won't matter to the test procedure.
An enclosed High Intensity LED behind a pinhole aperture (a lens may be used to focus the light on the pinhole from the LED if so desired in the same fashion that a bright light source may be done for the Foucault test) may be placed above or below an microscope magnifier mounted on a longitudinal measuring-slide similar to those used for other C-of-C mirror tests like the Foucault tester. The pinhole and microscope may move together, or separately as desired as with the various designs of the Foucault tester with a moving or stationary source. If separate, the mathematical analysis must, of course, be adjusted appropriately as the motion of the viewing stage is going to be twice that of the pinhole and microscope together. The measuring slide's mounting should also be capable of adjustments, which will permit bringing the pinhole, and the microscope's axis into alignment with the mirror's axis of symmetry. (This will also have the effect of setting the microscope magnifier's field perpendicular to the test axis in the horizontal aspect.)
The unfortunate thing about this test is that a pinhole must be used as we are going to be viewing the returned image of that pinhole with the microscope. Thus the slit or half slit that would be fine with the Foucault test won't work right.
The Ocular Magnifier AKA a microscope:
For the ATM who wishes to give this approach a quick trial look, a 10X hand magnifier or a "positive eyepiece" (i.e. one with an accessible field) of about 1 inch ( 25 mm) focal length, will be a good choice. Some idea of the depth of field of a "positive" magnifier may be gained by stacking a few small overlapping slips of known-thickness sheet material (e.g., paper, or leaves of a feeler gauge) with edges staggered enough to reveal narrow strips of their surfaces. Viewing such a stack "flat-side on" will allow noting which, or how many, exposed adjacent step surfaces of known depth-difference are able to be focused simultaneously. Their total thickness will allow estimation of the size of this source of longitudinal uncertainty in locating the crossover position. In practice, one can improve matters by mounting a horizontal taut thread in the plane of the eyepiece's field stop. Set the crossover measurement with the thread in "sharpest" comfortable focus, while simultaneously superimposing the left and right test-mask-aperture derived images.* (It also helps to keep both eyes open, and to fixate the non-eyepiece eye on some not very close visual target, such as the masked mirror itself. As an "eyepiece test" uses light fairly efficiently, enough subdued room illumination to allow for this is usually tolerable.)
Compound Microscope as Ocular:
For higher precision DAFT measurements, a compound microscope has advantages as the ocular. This may be built by an ATM, perhaps by judiciously assembling "junk-box" parts.
For example: My current testing microscope's eyepiece was scavenged long ago from a broken pre-WW2-vintage binocular. The objective is a 3/8 inch diameter, ~ 0.75 inch focal length, plano-convex simple lens, that I made (out of plate glass) nearly 20 years ago, as practice, while trying out a new small-lens-spindle setup. For the monochromatic light from LEDs, achromatism of the lens is not an issue so a single piece of glass for the lens is quite fine. The microscope's aluminum tube was cut from material salvaged from a discarded lawn chair or you can go all kinds of fancy with a lathe and make a nice tube for a small microscope as desired. Those who work in wood can always make one from that.
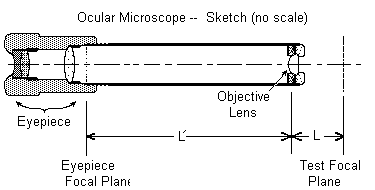 Besides offering magnification of the pinhole images and their diffraction spike labels, the compound microscope can reduce uncertainty in the axial location of the crossover. This is a consequence of the optical property that longitudinal magnification varies as the square of transverse magnification. In Figure 3, assume focal length of the objective lens is f' = 0.7500 in. The tube length, L', is 8 in.; so, by the thin lens formula:
1/L =1/f ' -1/L' = 1.2083333, and so L = 0.8275862.
The transverse magnification = image size at Eyepiece Focal Plane, divided by image size at Test Focal Plane:
L'/L = 8 / 0.8275862 = 9.666667X.
(With a 10X e.p., total transverse magnification is 96.66667X. or, a little less than 100X.)
Since optical systems are reversible, we can find that the diameter of the visible Test Focal Field is equal to the diameter of the Eyepiece Focal Field times L/L', or that the visible Test Field is 1/9.666667 of the Eyepiece Field's diameter. However, the depth of field at the test plane will be equal to 1/(9.666667 ^2 ) times the depth of field of the eyepiece. So if the estimated depth of the eyepiece field by the above "stacked strips" procedure is 0.003 in., then the estimated depth of field at the test plane is 0.003 in. x 1/93.444451, or only 0.0000321 in.!
Now assume that in testing, the viewer accommodates 0.003 in. closer to his or her eye, making L' equal to 8.003 in. instead of 8 in., we can see how much effect this has on the measurement (and also check up on the square law of longitudinal magnification used previously,) by substituting 8.003 as L' in the thin lens optical law, so that
1/0.750 in. - 1/8.003 in. = 1/1.2083802 in., and L now is 0.8275541 in.. We then see that 0.8275862 in., minus 0.8275541 in., equals 0.0000321 in., demonstrating agreement with the above square law of longitudinal magnification result. **
Masks:
I have followed Schroader's recommendation from ATM III , for the Gaviola Caustic Test, and have used circular apertures no larger than R/100, where R equals the radius of curvature of the central zone of the mirror. (I have not independently verified the validity of the <R/100 specification.) I certainly subscribe to Schroader's stipulation, that the mirror's curvature most be "smooth", which I take to mean optically polished, as well as monotonic in contour, and without short-radius anomalies visible by Foucalt knife-edge examination.
Materials for masks might include: light-weight wall paneling, aluminum flashing, good quality cardboard, or one of my favorites --- pieces of the thin plywood used to make crates to ship the citrus fruit known as "Clementines." The important thing is to make the apertures round and centered on the midpoint of the zone being tested. The diffraction string needs to be crossing at the middle of each zone and is the marker in the test of the actual center of the zone. A rectangular zone mask will, of course, make another set of diffraction spikes which may confuse your eyes in the testing.
Circular mask apertures can be located by conventional layout techniques to within a few thousandths of an inch, by using a machinists scale graduated to hundredths (mentally subdivided to thousandths,) an eye loupe or simple lens magnifier, and a sharp scriber, followed by careful application of a good center punch. Use of center and pilot drills will help maintain accuracy in drilling the actual apertures.
In DAFT Figure 3, the wires (actually elastic thread) are wrapped around short pegs press-fitted and glued into holes located in the above fashion, and the thread is then also glued where it is clove-hitched around the pegs. (I use Elmers Glue-All for this, as it can be softened and removed with warm soapy water, for repairs or adjustment.)
Analysis:
Essentially, the familiar calculation methods and programs, such as TEX and other programs, used for data processing as obtained by zonal Foucalt Tests with Couder Masks, pin sticks, etc., may be applied to crossover longitudinal position data obtained by DAFT without modification as the location derived from the DAFT method is the same drived from the Foucault test, the C-of-C of the zone. The difference is that the fact that the actual foci of the light from the zonal test apertures do not all lie on the symmetry axis of the mirror, but instead describe a caustic, is taken into account by the DAFT data gathering method. What is assumed, although not true, for conventional Foucalt zonal testing, is true for DAFT, namely that the center of the crossover of the two apertures is indeed where the measurement is taken.
Wm. S. Maddux
Notes:
*We oldsters do sometimes have an advantage over those of fewer years. In this particular case, not owing to our more mature wisdom, merely to our more mature presbyopia.
**Of possible interest to ATMs, the behavior of longitudinal magnification offers an interesting way to make precise measurements of differential longitudinal position, by employing a sliding eyepiece moving along a relatively crudely graduated longitudinal scale. (A simple card-and-fabric bellows can join the eyepiece holder to the objective mount as an "extendible light-shielding tube.") In the above example, the longitudinal magnification starts out as 0.003 in. resultant enlarged scale interval, for an object shift of about 0.0000321 in., and of course magnification increases with further movement in the same direction. Aside from figure testing, this principle might be applicable to spherometers, wedge measurers, etc., where high precision results, without the need for highly precise instrument construction, can be a boon to the amateur, (or to the professional.)
 Consider one of the more precise methods, the Gaviola Caustic Test, as first made known to many ATMs in the mid-1950s, (by Irvin Schroeder, in Book Three of the Scientific American ATM triad.) For a beginning ATM, or for those without access to a good workshop, the Caustic Test's need for a rather precise two Cartesian coordinate measuring apparatus may be a bit daunting. What is the worst thing with the Caustic Test's promoters is the advanced workmanship shown with the equipment that the promoters have used. Thus, those paired orthogonal measurements indicating the caustic curve of the actual focus of the zones as used in the caustic test are only one possible path to the ATM's testing goal of finding the shape of the mirror. Since the location of the common crossover point on the mirror's axis for the two cones of light from horizontally paired zonal mask apertures, shown in the image to the right and if known to sufficient precision, provides enough information to determine the slope of the mirror at the zone being investigated. This point is the point at which the Foucault test is supposedly measuring the shape of the mirror. The question then arises, how might we conveniently locate the crossover point with sufficient precision without a lot of delicate measuring of the caustic curve? The knife-edge of the Foucault test is insufficiently accurate for that purpose as the darkness of the mask aperture is a very subjective thing. The traditional method in the Caustic Test is to take a wire and use it to obstruct the image of the pinhole being returned. This again is a bit subjective as, while the minimum can sort of be found, that minimum is often somewhat broad in its postiion.
 In Figure 1, is a sketch of the two mask-apertures equipped with cross wires. Note that one is vertical/horizontal and the other is at 45 degrees left and right and that the apertures are round rather than the regular arc of the Couder Mask used with the Foucault Test. Below that are stylized representations of the images produced by the left aperture (A)and by the right aperture (B). In (C), the appearance of the images in a plane transverse to the mirror axis somewhat inside crossover is shown. (Outside crossover, the [B]-image would be to the left of the [A]-image.) Their symmetrical superposition at crossover is represented in (D) which occurs when the two images overlay each other at the focal point of the curvature of the mirror at the locations where the apertures are..
 Figure 2 shows one possible modification of the "wire" arrangements, which can enhance the setting precision, as illustrated with the 4 images, [A] with the left aperture, [B] the right aperture, [C] with the two away from the focus position in the scope and [D] with the two apertures at the focus position.
 Besides offering magnification of the pinhole images and their diffraction spike labels, the compound microscope can reduce uncertainty in the axial location of the crossover. This is a consequence of the optical property that longitudinal magnification varies as the square of transverse magnification. In Figure 3, assume focal length of the objective lens is f' = 0.7500 in. The tube length, L', is 8 in.; so, by the thin lens formula: