
| 16.5" diameter (419.1mm) | 3/4" thick (19.05mm) | |
| F4.55 | Ronchi grating 100 lpi | |
| FL 75" (1905mm) | ROC 150" (3810mm) | |
| |
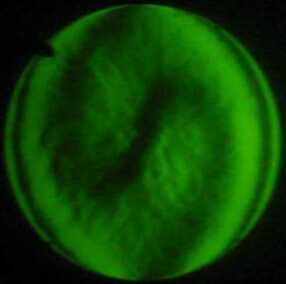
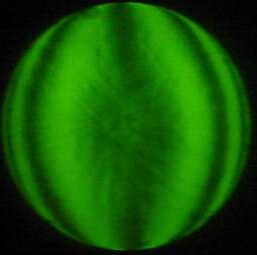
The above photos of a Ronchi test on the mirror on the original test stand, a typical stand with two pegs supporting the mirror, holding the mirror approximately vertical for testing with a Foucault or Ronchi tester like most mirror stands are made. Notice black mark at 2 o'clock position is changed between the photos to the 10 o'clock position. This indicates that the surface of the glass itself isn't the problem but rather the support mechanism of the test stand is affecting the surface. That black mark is a piece of tape to mark the mirror orientation. Notice that the mark has moved 45 degrees counter clockwise between the first and second image. Yet the shadow shape shows no appreciable difference. Additional surface roughness is caused by the fact that the airconditioner came on and a mini storm brews on the surface of the mirror.
The stroke beomg used was a "W" stroke, edge to edge, 1.5" overhang, pretty much a standard stroke to produce a parabolic surface, with a 7.75" Star lap. Solid center size 3"
This is the stroke that had been used for the last eight sessions. The last normal Ronchigrams showed 85% correction but sorry, no pics of that.
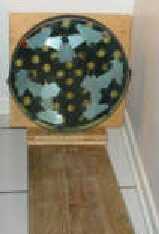
 The program PLOP was run to determine the location of a large number of mounting points for a mirror cell and a mirror cell built as well as setting up the whole test so that the mirror is near the floor pointed up towards the tester just as it would be in the final telescope.
This next photo on the right shows the value of using the PLOP program to make up a mirror support for the glass. Nothing was done to the mirror except to put the mirror cell under it on the test stand.
The roughness in the center of the mirrort is probably from using a star lap and digging deep. The level of parabolization isn't quite at 100% although matching Ronchi patterns to RonWin20 show that the lines are to far apart by about 1/10th of an inch. Otherwise, you can see that the lines have become nicely corrected to non-astigmatic lines. Also note that there is no turned edge indicated in the images.
 | This is how the mirror is on the stand, looking down 12 feet of 2x12 from the tester to the mirror. You don't need to use a long piece of lumber like this if you don't feel the need as any good stable table can hold the tester and the mirror stand just supported by a sloped base to point up to the tester. |
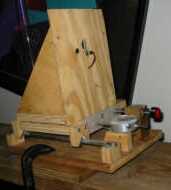 | This is a rendition of the Stellafane tester. These things are very easy to build and the sooner you build one, the better off you will be with testing. The dial indicator is from Harbor Freight and can be had on sale for $8 and that is usually the most expensive single part of the tester. Scrap wood is often used and that brings the cost of the lumber to picking it up from somewhere else.. |