John M. Pierce's HobbyGraph Articles

HobbyGraph #15

Diagonals and Diagonal Supports.

      Most reflecting telescope are of the Newtonian type as this is probably the simplest to make and mount and in ordinary focal ratios is probably the most generally satisfactory for amateurs to use.
      The Newtonian reflector has a small diagonal mirror or prism introduced into the telescope tube to throw the focal point outside where it can be examined and magnified with an eyepiece.
      While the best diagonal is an elliptical mirror difficulties in making and mounting have made the prism or a rectangular flat favorites with amateur makers. The size of the prism or width of mirror is (Ad/F)+aD/F (Fig. 1) where "a" is the diameter of the field lens of the eyepiece. Use a low power eyepiece in calculating the diagonal for a large telescope or if you use an elliptical flat. If a prism is to be used a value of a = 1/2" can be used. In any case if the diagonal is smaller than theory indicates the loss of light transmitted will be with low powers where it is not so important. A 6" mirror of 50" focus would take a 1 1/2" wide diagonal to fill the field lens of a 1 1/4" eyepiece. Actually we usually use a 1" or 1 1/4" prism or a 1 1/4"x1 3/4" rectangular flat for this telescope.
      A convenient way to mount a prism or rectangular flat is with the prism-eyepiece holder shown in Fig. 2
      The casting is bolted to the telescope tube and carries a cut away 1 3/8" diameter brass tube. This supports the diagonal in its cradles at one end and the eyepiece at the other. Adjustment is by sliding and turning the brass tube in the casting, and by tipping the entire assembly by the adjusting screws in the casting.
THE CUT-AWAY OF THE TUBE
      The cut-away supporting tube is 1 3/8" outside diameter with a 1/32" wall. Its length may be found by adding together the radius of the telescope tube, 1/2 the prism size, and the distance you want it to project beyond the telescope tube - we'll make this 1 1/2". Suppose that you have a 6" mirror in a 7" metal tube and are going to use a 1" prism for a diagonal. The 1 3/8" tube will be 3 1/2 + 1/2 + 1 1/2 or 5 1/2" long. From this we cut two slots 1" wide. The length of the slots is the sum of the radius of the speculum + 1/2 the prism + 1/4" or 3 + 1/2 + 1/4 or 3 3/4". Mark the slots carefully with a pencil and make a cut with a hack saw at the bottom of the slot. Do not cut the full width of the slot as we want the corners to be rounded. Then cut out the slots with medium size tin snips. Follow the procedure shown in Fig. 3. It is the result of making some hundreds of these holders. Round the corners of the slots with a rat tail file and remove all burrs and sharp edges with file and scraper. Next flatten the prongs with a hammer. I use a short piece of angle iron held in the vise for an anvil.
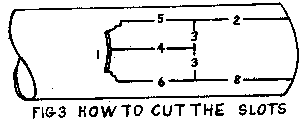
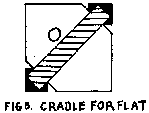
1. Cut with hacksaw.
2. Cut with snips. Go as deep as you can.
3. Bend up and cut off.
4. Cut with snips.
5. Same as $4. Bend up and break out.
6. Same as #5 but leave it until opposite slot is done. This gives more room to control the blades of the snips.
THE EYEPIECE BUSHING

      The eyepiece bushing holds the eyepiece and allows focusing by sliding in the supporting tube. It is made from 1 5/16" tube with 1/32" brass, 1 5/8" long or longer if necessary to focus, depending upon the eyepiece used. Tubes that are too tight can be polished down with emery cloth or the inside enlarged with a three cornered scraper. If too loose flattening in a vise will give the right pressure to slide easily yet be tight enough to stay put.
THE SECONDARY CRADLES

      The cradles are made from squares of sheet copper. If this is not available use pieces of tin can. Lay the prism on the blank and mark around it. Then cut as shown in Fig. 4. Saw and file out a template from 1/8" or thicker steel making it the shape of the prism but slightly (1/64") larger. This is held with the cradle blank in the vise and the tabs, shown blacked in the drawing, are bent down to hold the corners of the prism. Drill a 13/64" hole for the 3/16" machine screw that clamps the prism and its cradles between the prongs of the cut-away tube. If the corners of the prism are cut off as is frequently the case, omit the tabs marked "o" in Fig. 4 and bend the corners of the cradle down to fit the ground off corners.
      Cradles for a rectangular flat can be made in a similar manner. Fig. 5 shows how to lay out for this. A piece of square key stock makes a good template.
      Lay the finished cradle on a flat prong of the prism tube, centering it carefully, and mark the position of the hole. Prick punch and drill the prongs. Spread them as needed to fit the size prism used. Assemble by putting the prism into its cradles, and this between the prongs making the holes line up. Then put in the 3/16" machine screw and tighten its nut to hold all in place.
      To locate the casting on the telescope tube: Subtract 1/2 the prism size from the length of the prism tube. Subtract this amount from the focal length of the speculum. Mount the casting at this distance from the speculum. Example: - our 6" mirror is 50" focal length and has a 1" prism. The prism tube was found to be 5 1/2" long. Taking away 1/2 the prism size leaves 5". Subtracting this from 50" leaves 45". So we measure 45" from the front face of the mirror and cut a 1 12" hole for the prism tube held in the casting.
ADJUSTMENT OF THE PRISM-EYEPIECE ASSEMBLY.
      With a pen put a 1/16" ink dots at the exact centers of the speculum and both square prism faces. With crossed threads held by tape mark the center of the eyepiece bushing. (No eyepiece) Assemble the telescope and point it at the sky. Look through the eyepiece tube and adjust prism by tipping it and turning the prism tube until the speculum looks central in the field of view. slide prism tube radially and readjust prism until all reflections are centered and ALL DOTS COINCIDE.
      P.S. (We assume that the speculum had been lined up in the tube.)
DIAGONALS,

      For large telescopes elliptical diagonals are preferred to rectangular ones both because of the smaller area of the speculum that is obscured and for certain optical advantages that we will consider later. They are usually held on a spider, separate from the eyepiece holder. A central circular block is held in the tube by three of four thin arms of metal. These are soldered to the block and have screw adjustments at the outer ends to allow accurate centering in the tube. The diagonal is held at an angle of 45deg. in a tubular holder. This is fastened to the spider block by push and pull screws for fine adjustment both in angle and axially, to line the diagonal up with the axis of the eyepiece and that of the speculum. Fig. 6 shows such a setup. The central screw in the block pulls the diagonal tube against the three adjusting push screws.
      Photographs of star fields show star images of several distinctive forms. The stars usually appear as round dots of sizes that increase with the brightness of the star. Sometimes you will see the brighter stars equipped with thin rays flaring out in symmetrical patterns. These rays are the diffraction effects of the arms supporting the diagonal. If the diagonal is held on a single arm or on several parallel arms, bright stars will show rays on both sides of the star image at right angles to the arms as seen in Fig.7. If the spider has three arms equally spaced the image will have 6 rays, and if there are four arms there will be 4 rays, forming an equal armed cross.
      Photographs taken with a refracting telescope have no rays of this type, even on the brightest star images. Do not mistake the elongation of the image due to oblique aberration found on stars near the edge of the fields for diffraction flare. The latter is equally apparent all over the field. Equally good images are produced by long focus Herschellian reflectors. (See Hobbygraf #9 on the Herschellian)
DIAGONALS.

      All telescope show diffraction effects due to the circular edge of the objective lens or mirror and to the diagonal, or rather, the circular block that supports it. These produce a series of rings of light surrounding the central bright star disk. They are only visible when conditions are favorable, and the number seen is and indication of atmospheric conditions that affect goo seeing.
      It is important to keep the diagonal as small as possible, as the brightness of the rings increases with the size of the diagonal. A round diagonal block is desirable since this produces circular rings that match those from the objective edge. A prism or square obstruction would introduce rays at right angles to the straight lines of the obstruction. As those sides are shorter than the spider arms, the rays produced by them would be fainter. In any case the diffraction patterns of rings and rays are visible only with higher powers and when the seeing is exceptionally good.
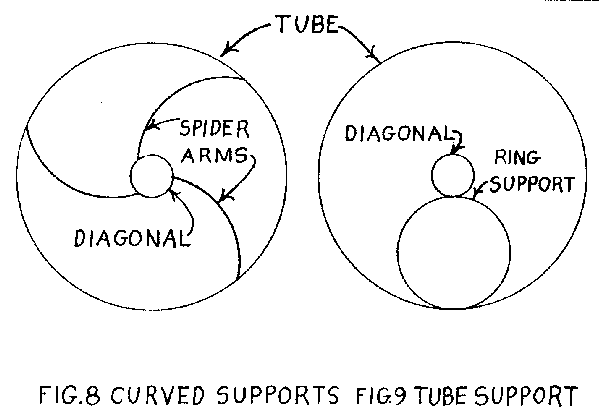
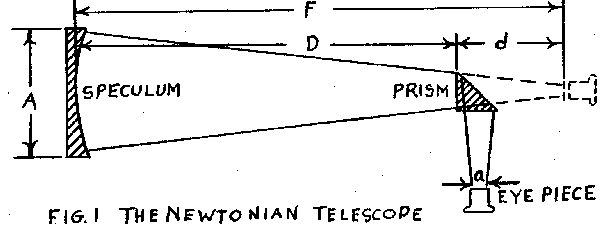
      Rays cause by diagonal supports may be eliminated if the supports are so curved that their total effect is circular. This prevents localized flares and gives a better image for some purposes. However the light of the flares is still outside the central star disk. We have simply spread it out as an edge around the disk, with becomes very slightly larger and fuzzier.
      Fig. 8 is a 3 armed spider with a circular diagonal that would show no rays. Each arm is 1/3 of a circle. If 4 arms are used each would be 1/4 of a complete circumference. Fig. 9 shows another plan equally good. Fig. 10 is Wally Everest's masking strip which he placed over the supporting arms, with gratifying improvement to his star images. Note that the edges are made up of semicircles. If the arms were threaded or grooved to give this profile the results should be equally good.