These methods of "cashing-in" on a hobby do not, by any means, exhaust the possibilities of obtaining financial remuneration from active engagement in telescopy. Many other suggestions are presented in the article, to which the reader is referred.
Let us first explain the most important kinds of telescopes. A refracting telescope uses a lens to gather in and focus the light from a distant object; a reflecting telescope uses a concave mirror for this purpose. While either type can be made by an amateur, the reflector is so much less expensive, and so much easier to make, that we will confine the present series of articles to the making and using of the reflecting telescope.
There is another advantage, still more important than the cost of the reflector, over the refractor. With even the best of refractors, there is surrounding all bright stars, a colored fringe, due to the prismatic effect of the lens on the light passing through it. This is entirely lacking in the reflectors because the light does not enter the glass, but is reflected from the front surface and all the colors are reflected equally. thus there is no breaking up of the light from a star into it's component parts and a truly achromatic, or true to color, image results. the necessary parts of the reflecting telescope are:
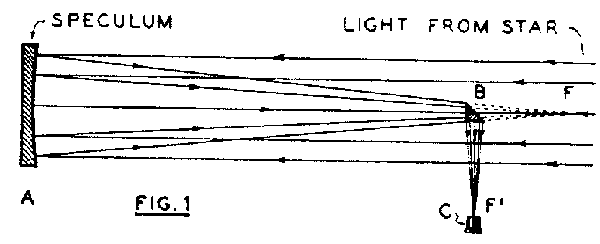
First, and most important, the concave mirror (A. Fig.1).
Second, the prism or diagonal mirror, to deflect the image to one side (B Fig. 1).
Third, the eyepiece, to enlarge the image (C Fig. 1).
|
Besides these optical parts you must have suitable supports to hold them securely and permit their being pointed toward any star or object to be observed.
That is a very brief introductory description of the reflecting telescope. Before the series is completed, the interested reader will have a much more detailed knowledge of the principles of telescope building and the technique of using them.
Perhaps, before we go further into the matter, you would enjoy knowing what results you can expect in star gazing with such an amateur. If you make a six inch mirror carefully, and mount it, you will be able to see the mountains of the Moon, in great detail; the rings of Saturn; the belts and satellites of Jupiter; the icecaps and surface markings of Mars; Sunspots; Nebulae; double stars and clusters of stars. It is certainly worth the work to be able to won an instrument which will bring in all of these wonders.
The cost of the home-made instrument is small, when compared the thousands of dollars a professionally made instrument of the same power will cost. The cost may be made almost as small as you wish, and fi, as you progress with the work, you want a few more refinements, these may be purchased at a relatively small amount. Let us discuss the essential expense.
The larger the mirror is, the more light it will gather, and the more of the fainter stars it will show. A 6 inch mirror has about 1000 times the area of the pupil of the eye; so it will make visible stars which are 1000 times fainter than the dimmest we can see with the naked eye. Such a mirror of excellent quality can be purchased for about $50, but you can buy materials for $6 and make it yourself.
A good prism costs $6; but instead of a prism you can select a small piece of broken windshield or plateglass mirror as will be described later on. This will give you good results. A good eyepiece can be purchased for $4.00. If you have a small lathe you can make your own, buying the eyepiece lenses or even make them yourself.
The mount can be elaborate as you desire. Very satisfactory ones have been made from odds and ends, at little or no expense. Such a mount, made largely from wood, will be described later. Also one can be made from metal, for those having access to a lathe or drill press. So you see, your telescope need cost very little. A satisfactory one can be made for as low as $10.00, and a very aristocratic one for about $25.00.
Apart from the joy of accomplishment in telescope making, I want to point out several other distinct assets to be gained from this hobby. First and foremost, naturally, is the pleasure you will derive from the studying of the heavens, and seeing for yourselves the wonders hitherto known only from pictured descriptions. Next to that satisfaction, you will find that your hobby will attract to you the attention of the most worthwhile of your neighbors and fellow citizens, even in a large community. There is something about it which will mark you out as being distinctly out of the ordinary. In nearly all of the larger centers have sprung up groups of amateur telescope makers and astronomers, who meet monthly to talk over their problems and their triumphs. It is something to be able to gather with people of your own interests. There is another phase of amateur telescope making which, especially at present, may appeal to some. Let me tell you of a few ways in which you can make your telescope hobby pay dividends.
Besides the summer camps, there are hundreds of other places suitable for the one night stand, or for a more pretentious setup. Beach resorts, military encampments, fairs, wherever there is a crowd - you can count on customers in these days of scientific interest.
I might say that for the publicity or for attracting a crowd, a false tube can be made as large as you can handle - say a foot in diameter by twelve feet or more long, surrounding you real telescope tube, which will be about 7 inches in diameter by 4 feet long. Similar ballyhoo stunts will occur to the live exhibitor.
The greatest pleasure and benefit which comes from making and using a telescope, however, is not the possible financial returns, but rather the satisfaction of viewing the wonders of the heavens through an instrument of the observer's own construction.
We will describe the making of a reflecting telescope of 6 inch aperture and about 50 inch focal length - an excellent size both to make and use. The glass is of the right size to handle easily, in grinding and polishing; the instrument is compact and easily handled and, if necessary, transported; and it makes a very powerful telescope.
Procure a round disc of glass, 6 inches in diameter by at least three quarters of an inch thick; this is for the mirror. A similar, but somewhat thinner disc if desired, is used for the tool. We usually use a tool one half inch thick, which is satisfactory.
 You will also need abrasives of various degrees of fineness. We use the following sizes: Nos. 80, 120, 220, 400 and 60 aloxite and 600 emery. One pound of the No. 80 and a 2 oz. can of each of the others will be ample. A pound of Wilmington pitch and a 2 oz. box of optical rouge completes you list of the necessities for the grinding and polishing of the mirror.
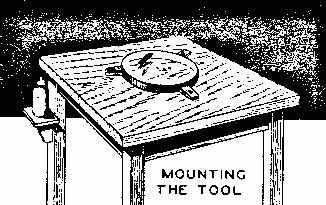
We are now ready to start the mirror-making. The glass disc is used as the tool (the thinner of the two discs of glass) is fastened down on the corner of the workbench by nailing 3 wooden cleat around it.
You will also need abrasives of various degrees of fineness. We use the following sizes: Nos. 80, 120, 220, 400 and 60 aloxite and 600 emery. One pound of the No. 80 and a 2 oz. can of each of the others will be ample. A pound of Wilmington pitch and a 2 oz. box of optical rouge completes you list of the necessities for the grinding and polishing of the mirror.
We are now ready to start the mirror-making. The glass disc is used as the tool (the thinner of the two discs of glass) is fastened down on the corner of the workbench by nailing 3 wooden cleat around it.
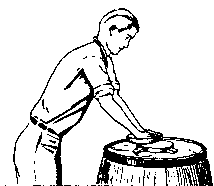 The "tool", another disc of glass on which the abrasive or polishing material is put, is clamped to a table or barrel as shown. A weighted barrel makes an excellent bench, since the operator can easily walk around it.
Sprinkle on about half a teaspoonful of the No. 80 grit, and wet the grit with about the same amount of water. Now rub the mirror blank on this tool; using a straight over the center stroke, about six inches in length. Between strokes, the operator rotates the mirror blank, so that the grinding operation will be done by strokes in all directions. For this same reason we move back and forth around the corner of the workbench to distribute the wear on the tool. As the abrasive wears out, lift the mirror from the tool and add more abrasive and water.
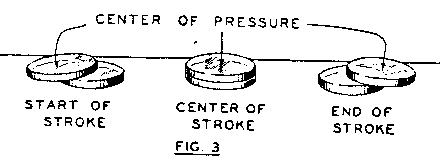 After thirty minutes or so you will be able to see that the mirror is becoming concave and the tool convex. The reason for this is simple enough. When the two pieces of glass are exactly central with each other, the pressure from your hands and arms is evenly distributed over the grinding surface, and hence the grinding would be equal all over; but this is the case for only a very short time each stroke. Most of the time the mirror is not exactly covering the tool, and at such times the pressure is concentrated at the central area of the mirror and the edge of the tool (Fig. 3); causing more rapid abrasion at those places, and giving our desired concavity to the mirror, and convexity to the tool. This illustration show why the mirror becomes concave in grinding. The methods used to perform the operation are presented in the text. Method of preparing the pitch lap used in the final polishing of the mirror. For further details the reader is referred to the accompanying text.
We continue to rough grind until the mirror has reached the right curvature. The depth of the concavity is equal to the square of the radius of the mirror, divided by 4 times the focal length. In this case, the radius of our 6 inch mirror is 3; the square of which is 9. the focal length of the mirror is to be 50 inches and 4 time that is 200. 9 divided by 200 gives 0.045 inches, the desire depth of the curve at the center of the mirror.
This may be measured by a depth gauge, or by a straight edge laid across the hollowed out surface with a feeler gauge slipped under it. An excellent way is to file a nail or piece of wire to the required size, using a micrometer to measure it, this used as a feeler, and rough grinding is stopped when the wire will just slip under the straightedge laid across the mirror.
The mirror should now be thoroughly washed and the tool removed from it's cleats, and both tool and workbench are cleaned; so that no grain of coarse abrasive will be present to cause scratches when we are fine grinding.
The second grade of grit, No. 120, is used in a similar way. With this, however, and in all further grinding and polishing until we are ready to "parabolize", a short stroke is used. About one inch over the center, each way, or a stroke of about two inches total length, is suitable for a 6 inch mirror, with a proportionality longer stroke if your mirror is larger than 6 inches. Grind for a half hour with each of the different grades of abrasive; finishing with the No. 600 emery, which leaves the surface in excellent condition for polishing.
The following hints and cautions should be observed:
The surface should be examined with a magnifier from time to time during fine grinding. In this way, the coarse pits left by the previous grades of grit can be observed; and when they disappear, you are ready to proceed to the next finer grade or from the finest to polishing. Grinding may require from 4 to 6 hours. Polishing is rarely completed in less than 6 hours, and sometimes as long as 15 or 20 hours is required. The time required depends largely on the excellence of your find ground surface. If there are no traces of grit coarser than you No. 600 left, polishing should not require more than the minimum time; on the other hand, I know of one enthusiast who used valve grinding abrasive - about 220 - for fine grinding and took over 1000 hours to polish.
The first step in polishing is to make a pitch lap, and to do this, the pitch must first be tempered. Take a small chip of pitch and chew it. If it chews without crushing, it is too soft. If it crumbles and stays so, it is too hard. It should crush and then pack in about 4 "chews". If it is too hard, melt and add half a teaspoon of turpentine. If too soft add a lump of rosin and try again: repeating until the correct temper is obtained.
We make a pitch lap for polishing as follows:
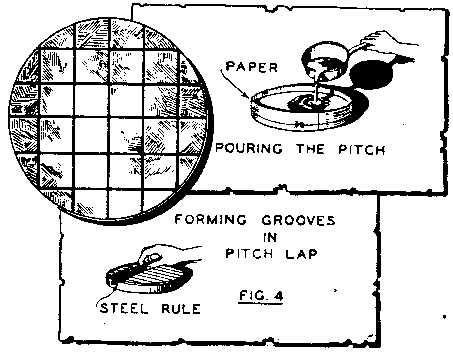 Wrap a strip of paper around your glass tool to form a rim, and tie or paste it on. Then melt your pitch and pour it on until it is about 3/16 inches deep. When it is hard enough to hold it's shape, remove the paper and, after wetting your mirror, mold the lap with the concave surface of the mirror until the two surfaces are in perfect contact. It may be necessary to place the lap in a basin of hot water to reheat several times before it is properly formed. Then form the grooves in the pitch surface, dividing the lap into square by pressing the edge of a steel scale or ruler into the soft pitch. This will spoil you contact with the mirror, so put the lap back into the hot water and reform as often as necessary. The grooves should be about an inch apart, giving the pattern shown in Fig. 4. Our abrasive for polishing is "optical rouge", a refined oxide of iron obtained by roasting iron sulfate or "green vitriol". Mix a tablespoonful with a half a glass of water and place it in a bottle which has a perforated top, or a piece of glass tubing projecting through the cork, so that the rouge and water can be shaken on to the lap.
Apply the rough to the lap or to the mirror, and polish as you ground; that is, using the short stroke, in length about equal to a third of the mirror's diameter; rotating the mirror between strokes; and moving back and forth around the workbench until a complete polish is obtained. In ten minutes there will be polish enough to reflect light; and from then on you can keep track of your progress by examining the surface with a magnifier. As you polish you will see the pits left from the grinding grow smaller and further apart until they disappear - first at the center and last at the edge of the mirror - giving you a perfectly polished concave mirror.
You will, probably, not complete your polish at one shift. A couple of hours will leave you ready for a rest. DO NOT leave the mirror on the lap for any extended absence or you may have trouble getting it off. I have had to melt the discs apart, which is a process rather dangerous to the mirror. Usually they will part if soaked in water and given a hard steady push. But the safe way is to separate them before you leave them.
After an absence you will probably find that the contact between the mirror and lap is poor; which will be indicated by uneven sliding, sticking, etc. You should again place the lap in warm water for a minute, and then press with the mirror before starting to polish. Above all things do not try to polish with a poor contact as this invariably leads to a surface made up of raised and depressed zones, with a central hollow or hill. You won't know you are getting this surface until you start to test; since the irregularities are so slight that they can be detected only by the way in which they reflect a beam of light. To get the best results in observing, a perfectly regular parabolic curve mush be secured.
How this parabolic surface is secured from the more or less spherical surface you will have at the completion of polishing, and how you know when you have obtained it will be detailed in the next paper of this series. With a tin can, an electric light bulb, a razor blade and a steel scale, we can test our surface and detect it's defects; even if they are so small as a very few millionths of an inch.
Here is repeated the list of supplies needed for making the mirror: