John M. Pierce's Telescope Making Articles
These articles are reproductions from the magazine of the '30s, Everyday Science and Mechanics.
Amateur Photography With Your Telescope
Part 10
The successful maker of a telescope is rarely satisfied to sue his instrument merely for
looking at the stars, moon, planets and other celestial objects. He soon wants to extend its
use to produce records of permanent value.
Celestial photography appeals to many, especially to those who have been enthusiastic
photographers of earthly objects.
Any camera can be used to photograph the stars. Select a good, dark star-lit night and set the camera to point to the north, about 45 degrees above the horizon. Expose for two hours or more. When the picture is developed, the star trails will show as arcs of circles, centering on the celestial pole. The larger the lens used, the more stars will show in the picture, so use your largest stop. If you are lucky enough to have a large lens - 3 inches or more in aperture - you may discover a straight line cutting the others. This would be the picture of a meteor or shooting star. These are rarely obtained by the amateur. Probably any lens having less than 3 inches aperture does not have enough light-gathering power to impress a meteor on the photographic film; the time of its passage is very short.
If the camera is pointed towards any part of the sky, the star trails will indicate the paths that the stars took in their movement across the sky from east to west.
If, at the start of the photographic experiment, you expose for 5 minutes, then close the shutter for 5 minutes and then open it again for the main exposure, you will be able to orient your film, as the short exposure will show the start of each star trail. In a photograph showing the polar stars this will show as a separate dot, starting the trails which proceed from it in a counter-clockwise direction around the pole. In pictures of other parts of the sky, the dot is at the east end of the star trail.
The moon can be included in a scene if the exposure is short enough. As the moon travels a distance equal to its own diameter in two minutes, however, you can count on getting a streak instead of a moon with an exposure of more than a few seconds. The diameter (in inches) of the moon's image is equal to the focal length divided by 100; thus, a 5 inch focus camera will give moon images 1/20 inch in diameter.
The Sun is about the same apparent size as the Moon; so don't take pictures of these bodies with a Kodak and expect sizable results. After the Jan. 1925 eclipse, someone sent me a beautiful photograph of an eclipse scene showing a sizable stretch of landscape with very realistic, ghostly eclipse effects: but, alas, the photographer had faked in the eclipsed Sun about as large as a cent - entirely out of proportion to the landscape and, not only that, but he put it in upside down, as shown by the coronal streamers.
In photographing the Sun with a camera, as in taking the phases of an eclipse, use the smallest stops and the fastest shutter speed. If necessary a special stop may be made of black paper; it should be about 1/16 inch diameter. If, however, the eclipse is total, to get that stage, open your diaphragm wide and expose for several seconds. The beautiful photographs of star fields and nebulae made by the large observatories take several hours' exposure. To secure such a picture requires a very accurate movement of the telescope to follow the movement of the stars as they travel across the sky. No clock drive is accurate enough for this; and an observer sits at an eyepiece and guides the telescope by moving either the entire telescope or the photographic plate so as to hold some selected star on the cross-hairs of his guiding telescope.
The moon is so bright that a fair photograph of it may be taken without moving the telescope. Very short exposures, however, are necessary, or a smudged picture will result.
Let us start at the beginning and see how we can use our photographic equipment in connection with our telescope activities. A photographic record of the Foucault shadows obtained in testing our primary mirror is interesting and valuable and easily produced.
Make the set-up for testing (mirror, lamp and knife-edge), using a large pinhole; adjust until the Foucault shadows show plainly, as described in previous issues. Remove the lens from your camera and set up the camera in place of your eye. The plate of film in the camera should be about a foot behind the knife-edge. This will give a picture of your mirror about 3/4 inch in diameter for an F8 mirror. Be sure to use a stop large enough to let the image of the mirror into the camera. If no large stop is available, you may have to set the camera nearer the knife-edge, which will give a smaller image. However, a camera is not necessary. If your room is light-tight, and can be made perfectly dark, simply setup a film pack or plate holder at the desired place, and expose. An exposure of 20 minutes should give excellent shadows, if the mirror has been silvered. If not, you had better expose for two hours. In printing, use contrast paper to accentuate the shadows. A few trial exposures will show the correct time exposure for the particular light, pinhole, and film you are suing. Fig. 2 is the type of photograph you may hope for. (Note: photographs didn't come through in good quality in the copying of the articles and thus while references to the photographs remain, the photographs themselves are not included in these pages.)
Photographs of your mount and the various gadgets you invent in making your telescope will be interesting to fellow enthusiasts. Send them in to this magazine: we are keeping an album of "Telescopes and their Makers".
But to get on to actual astronomical photographs. We will start with the Moon; because it is so bright that an exposure of 1/4 second with fast film, will give a good picture. This short exposure can be made without attempting to follow as is necessary in long exposures.
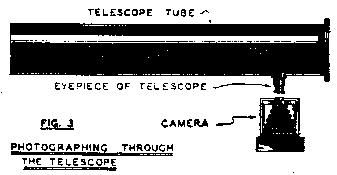 Any one of three methods many be used in photographing the Moon. The simplest is to adjust the focus of the camera for a distant object and, with this setting, hold the camera to the eyepiece of the telescope and photograph what is there. Of course the telescope must be pointed at the moon and the eyepiece carefully focused to give a good view with the eye before you replace your eye by the camera. Fig. 3 shows this method, a fairly long exposure is necessary - say one second or more.
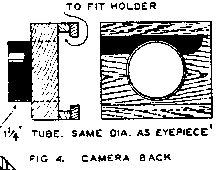
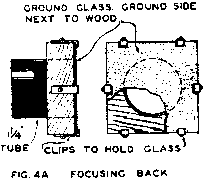
A better way is to use the telescope as a camera. The primary mirror corresponds to the camera lens, forming an image at the eyepiece. We remove the eyepiece and in place of it put a holder containing our photographic plate or film. Fig. 4 shows a camera back attachment to slip into the eyepiece tube. It is made to fit any small size plate holder or film-pack holder that may be available. Fig. 4A is a focusing back, similar to Fig. 4 except for a piece of ground glass mounted on it. Be sure the distance from the shoulder to the ground glass equals the distance, from the shoulder on the camera back to the face of the plate or film.
To use this back, the loaded plate holder or film-pack holder is place in position in the camera back so as to be ready. The focusing back is slipped into the eyepiece slide, clear to the shoulder and the moon is brought to a sharp focus by moving the eyepiece slide. Then quickly withdraw the focusing back and insert the loaded camera back, having covered the open end of the telescope with a piece of cardboard. Withdraw the slide from the holder, and make your exposure by moving the cardboard from the end of the telescope tube; then quickly replace it, after which the slide is returned to the holder and the operation is complete. A little experience will show where to have the moon's image on the ground glass so that it will be central on the film at the time of exposure. The image will be about 1/2 inch in diameter, if the focus of the mirror is 50 inches. A 100 inch focus gives an image of the Moon about 1 inch in diameter, and other focal lengths in proportion.
This method may also be used to advantage in photographing the sun's corona in a total eclipse. In this case, an exposure of half a second will be ample.
If the focal length of the mirror is more than 50 inches, it is advisable to provide an eyepiece slide a larger than the customary 1 1/4 inch; so that the outer edges of the corona will not be cut off.
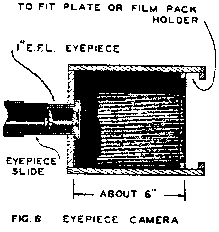
The third way of photographing with the telescope is to use the eyepiece as a camera lens. The eyepiece is so placed that the image formed by the mirror is at one conjugate focus of the eyepiece while the photographic film is at the other. Fig. 6 shows a camera made for this purpose. A slide carrying a ground glass should be provided for focusing. The procedure in photographic is the same as described in the preceding method with Fig. 4; except that a focusing slide takes the place of the separate back shown in Fig. 4a. This method of photography gives a larger image than the proceeding one, so a longer exposure is needed. The size of the image depends on the eyepiece, and the length of the camera, as well as the focal length of the mirror. If a bellows body or other scheme for extending the camera is used, images of varying sizes may be obtained When the proper exposures for an image of one size is found, the time needed for any other size will be in proportion directly as the squares of the diameters. Thus, an image of twice the diameter will require four times as long an exposure.
The three methods of photographing so far described can be used with any kind of a mount or stand for holding the telescope in position. When star fields and nebulae are photographed it is necessary that the object be followed as it crosses the skies, because of the earth's rotation. This requires an equatorial mount, with slow motions on both axes. Some sort of guiding telescope is necessary, and it is desirable that this guiding telescope be as long a focus as possible for accurate guiding.
Beautiful pictures of star fields may be taken by mounting an ordinary camera on the telescope and then using it to guide the telescope. Fig. 7 shows how a small camera can be clamped to the telescope tube for this purpose.
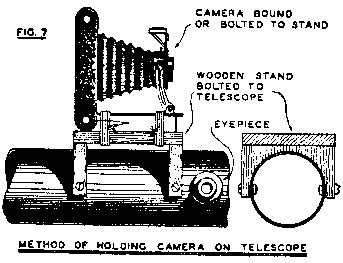 Provide an eyepiece with cross-wires, and place some selected star on the cross-wires. Then open the camera shutter and (looking through the eyepiece) use the slow motions to hold the star on the cross-wires. Guiding will prove very tiresome; so be sure you eyepiece and slow-motion controls are placed where you will be as comfortable as possible.
Exposures from 10 minutes to several hours may be taken and will show many stars invisible to the eye, even with the telescope, provided the exposure is long enough.
A motor or clock to turn the polar axis will help by reducing the attention necessary in guiding. Even with a perfectly timed clock, however, slight adjustments are necessary from time to time on both axes because of slight shifts in the apparent position of the star due to changes in the refractivity of the intervening air as the star changes in altitude above the horizon.
The simplest accurate driving clock consists of a synchronous motor geared down to turn the telescope once in a sidereal day. Because of the earth's movement around the sun once a year, the stars rise slightly earlier each night. This makes the star day, or sidereal day, slightly shorter than the civil day or sun day. The civil day consists of 24 hours of 60 minutes each, and each minute consists of 60 seconds, making 86,400 seconds; but the star day is 3 minutes 56 seconds shorter than the solar day, making it 86,164 solar seconds.
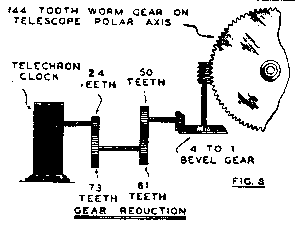 It is necessary to gear our motor down in order to turn the telescope on its polar axis at the rate of once in a sidereal day or once in 86,164 solar seconds. Small telescopes can be satisfactorily driven by a large synchronous clock motor. These motors usually have a built-in gear reduction that causes the terminal shaft to turn once a minute. A suggested suitable further reduction is shown in Fig. 8. This gearing is accurate to a fraction of a seconds in 24 hours - much more accuracy than is necessary for the amateur. A 1/20 H.P. synchronous motor is powerful enough to drive any amateur's telescope.
Fig. 9 shows how one amateur reduced his motor speed by the use of worm gears, and connected it with his telescope. It is well, with a motor of this size, to set it on a separate base from the telescope and connect it with the instrument by a flexible joint. This is usually necessary to avoid vibration, which would ruin the seeing.
Where electric current is not available a spring-driven phonograph motor may be used to drive your telescope. The crank can be brought out through the side of the housing and the speed adjustments used to regulate the rate of travel; Fig. 10 shows such a telescope.
The building of a good equatorial mount and drive-clock is something that each man wants to work out for himself. When he is familiar with the standard types of mount, he will want to embody ideas of his own in producing his own mount. The same is true of the drive clock. Whether he makes an electric, spring or weight-driven clock, it is to be hoped that his clock will be a little different from anybody else's.
There have been several thousand different mounts developed since interest in the amateur telescope started in America some ten years ago; but probably not more than a dozen successful clocks have been built. This is a good field for your inventive ingenuity.
 Any one of three methods many be used in photographing the Moon. The simplest is to adjust the focus of the camera for a distant object and, with this setting, hold the camera to the eyepiece of the telescope and photograph what is there. Of course the telescope must be pointed at the moon and the eyepiece carefully focused to give a good view with the eye before you replace your eye by the camera. Fig. 3 shows this method, a fairly long exposure is necessary - say one second or more.
 Provide an eyepiece with cross-wires, and place some selected star on the cross-wires. Then open the camera shutter and (looking through the eyepiece) use the slow motions to hold the star on the cross-wires. Guiding will prove very tiresome; so be sure you eyepiece and slow-motion controls are placed where you will be as comfortable as possible.
 It is necessary to gear our motor down in order to turn the telescope on its polar axis at the rate of once in a sidereal day or once in 86,164 solar seconds. Small telescopes can be satisfactorily driven by a large synchronous clock motor. These motors usually have a built-in gear reduction that causes the terminal shaft to turn once a minute. A suggested suitable further reduction is shown in Fig. 8. This gearing is accurate to a fraction of a seconds in 24 hours - much more accuracy than is necessary for the amateur. A 1/20 H.P. synchronous motor is powerful enough to drive any amateur's telescope.