John M. Pierce's Telescope Making Articles
These articles are reproductions from the magazine of the '30s, Everyday Science and Mechanics.
Finishing the primary mirror and making other parts of the scope.
Part 2
In Part 1 the operations of grinding and polishing the concave mirror for a reflecting telescope were explained in detail. If you followed the directions closely; particularly in regard to having proper materials; maintaining a good contact between the mirror and the pitch lap; and using a stroke whose overall length was approximately one third the diameter of the mirror - by now your mirror is probably quite spherical in shape.
Such a mirror will work adequately, and the results will appear wonderful to one who has never used a powerful telescope. It will show the craters of the moon, the moons of Jupiter and the rings of Saturn quite plainly; but when a star is observed, the defects of the spherical mirror become apparent.
The stars are so far away that, under even the highest magnification in the largest telescopes, they are still only points of light. In fact, because of optical reasons dealing with diffraction, the larger the telescope, the smaller the star image. When we use out spherical mirror to observe a star, the star does not appear as a minute, round point of light, but as an irregular disc of light having appreciable size and surrounded by a hazy glare of light; thus making it impossible to separate close double stars or see the individual stars in a cluster.
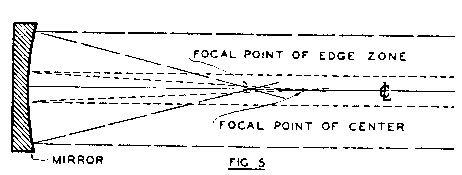 This is because of a phenomenon known as spherical aberration. When rays of parallel light, such as come from a star or other very distant object, fall on a spherical mirror, the edge zone of the mirror reflects these rays to cross the axis of the mirror at a shorter distance from the mirror than the rays from the central zone. (See Fig. 5.) When parallel rays of light fall on the spherical mirror, the zone of the rim brings the rays to a focus at a point which is closer to the mirror than the focal point of the center zone.
Intermediate zones have different focal points and the general effect is to give a very hazy image of the object observed. To get a good clear image, all the light rays from a distant point, falling on the mirror, must be reflected to a single point. To obtain this condition, the central portion of the mirror must be deepened; giving this area a shorter radius of curvature - just enough to bring the focal point to coincide with that of the edge zone.
I can be proved mathematically that a surface so shaped is a parabolic in contour; so we call the operation of polishing the mirror to the figure necessary for good definition of "parabolizing" the mirror.
Before considering in detail how we are to attain this perfection, we will explain the tests, whereby we can tell the shape of our mirror, and detect faults of a very few millionths of an inch.
Herschel, the father of mirror makers, had to judge his mirrors by their performance; he never knew whether he had a good one or not until he tried it on a star. The tests invented by Foucault changed all that however; and now, by using the Foucault test, any amateur can make better mirrors than the great masters of Herschel's time.
The apparatus is very simple. We must have an artificial star, and a knife-edge suitably mounted. The star is obtained by making a tin chimney for an oil lamp, and filing a spot opposite the flame, so thin that a needle can be driven through it - forming your "star" - a pinpoint of light. Another way is to drop a frosted electric bulb into a tin can, pierced as described. Fig. 7 shows a suitable knife-edge.
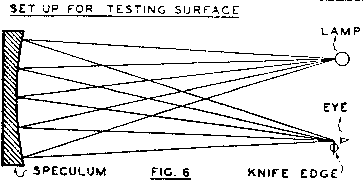
The setup for testing is shown in Fig. 6. The mirror or speculum is set on edge, on a table or shelf; and the lamp and knife-edge are setup on a table at the distance from the mirror equal to the mirror's radius of curvature, which is twice it's focal length. In this case, that radius of curvature will be about 100 inches.
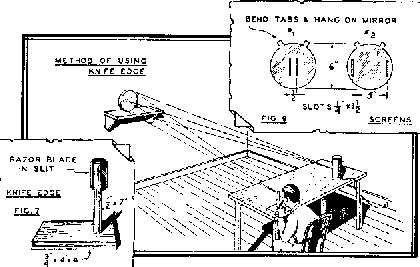 Setup for testing the speculum. Lamp and knife edge are located at twice the focal length, or at a distance equalling the radius of curvature of the mirror. The illustration above shows the method of testing the mirror. Fig. 7 presents a suitable knife-edge, made from a razor blade, and Fig. 9 indicates screens used for testing.
Now remove the lamp chimney, and move the lamp and your head around until you see the image of the lamp in the mirror. Move the lamp sideways and, if the image moves in the same direction, you are too near. Move back until the image expands and covers the entire mirror. If when you move the lamp, the image moves in the opposite direction, you were too far away. Adjust the mirror, lamp and knife-edge so that the image of the lamp passes close to the knife-edge and the entire mirror is flooded with light when the eye is held close to the knife edge, as shown in Fig. 6.
Now slide the knife-edge across to cut into the cone of rays between the mirror and the eye; the mirror will darken as the knife moves across the cone of rays. If the shadow appearing on the mirror moves in the same direction as the knife-edge you are too near the mirror; move the knife-edge a little farther away and try again. If the shadow appears in the opposite edge and moves across the mirror in an opposite direction to the motion of the knife-edge, you are too far away. Continue to experiment until the shadows appear on the mirror without moving across it. The lamp and the knife edge are then at the conjugate focal points of the mirror; the center of curvature is half way between them. They should be moved until the needle-hole and the knife-edge are equally distant from the mirror and quite close together when the shadows have no motion on the mirror. The mirror should be tipped to bring the eye and the needle hole to the same height.
All this preparation sounds very difficult and complicated; but it will work out very easily when you once get at it.
We are now ready to interpreted the shadows appearing in the mirror. These show us the figure of the curve, and suggest the treatment necessary to produce the parabolic surface desired.
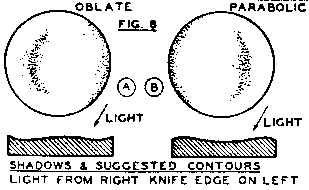
If no distinct shadows appear, and the mirror darkens evenly all over as the knife edge cuts off the light, then the mirror is spherical. A glance at Fig. 6 will make this clear. Since we are at the center of curvature, all rays from the pinhole are radii of the mirror and return to a perfect focus at the knife edge. Unfortunately this is not true when we are dealing with parallel light. So it is necessary to change this spherical surface, which is perfect when the light source is at the center of curvature, to the parabolic, which is perfect when the source of the rays is at an infinite distance.
To parabolize a spherical mirror, change the short polishing stroke you have been using (as described in Part 1) to a longer one, half or two thirds of the diameter of the mirror in length. This will wear out the center, giving the desired figure.
For all cases except the spherical, we will imagine the mirror to be illuminated by a distant light on the side of the mirror away from the knife edge. If the shadows suggest a ditch around a central island (as in Fig. 8A), the surface is oblately spheroidal - that is, the center has a longer radius of curvature than the edge. Long polishing strokes will make it first spherical and then paraboloidal. If the shadows suggest a raised zone around a central hollow (as in Fig. 8B), the surface is parabolic, and must be tested by zones, to determine when the proper figure has been reached.
Testing should be done frequently during the last stages of figuring; for a very few minutes of polishing may make a great change in the surface. If the figuring should be carried too far the surface becomes hyperbolic in shape. this is very difficult to correct. Short strokes may help; or you may have to return to fine grinding. The shadow of this surface is similar to that of the paraboloid but more pronounced.
 To test by zones, make two screens of heavy paper (as shown in Fig. 9). Cover the mirror with one screen, placing the slots vertical; and mark the position of the base of the knife edge when it is so placed that both slots darken at the same time when the rays are cut. Do the same, using the other screen. The two positions of the knife edge should be 0.07 inches apart; if the distance is less, continue to parabolize until this condition is reached. If it is more, you have carried figuring too far, and have the dreaded hyperbolic figure.
In figuring other mirrors use the formula:The difference in focal length of two zones equals D^2 - d^2/4R with D and d being the distances between the slots on the screens, and R the radius of curvature of the mirror.
With the completion of parabolizing, you mirror is finished except for silvering. It may take half an hour to parabolize, or it may require a much longer time; depending upon the problems which come up, differing with each mirror, and giving to the work the uncertainty which makes it so extremely fascinating.
Slight scratches do not seriously injure the optical performance of a mirror; so do not scrap an otherwise good glass because of this misfortune.
For your telescope you will need, beside the mirror: an eyepiece; a prism or diagonal mirror; and a suitable mount for holding these in proper relation to each other.
The eyepiece and prism are best purchased by the beginner. A good eyepiece can be bought for $4, while a suitable prism costs $6. Don't buy a cheaper one or you will regret it! If you can't get a first rate prism and eyepiece, you had better use a simple magnifying glass for the eyepiece, and cut a diagonal mirror 1 inch wide by 1 and one half inch long from a piece of windshield or other plate glass as a substitute for the prism. This should be silvered on the front surface.
Direction will now be given for making a very simple telescope with which the amateur can try out his mirror and other optical parts and see what wonders of the heavens his handiwork will bring to him.
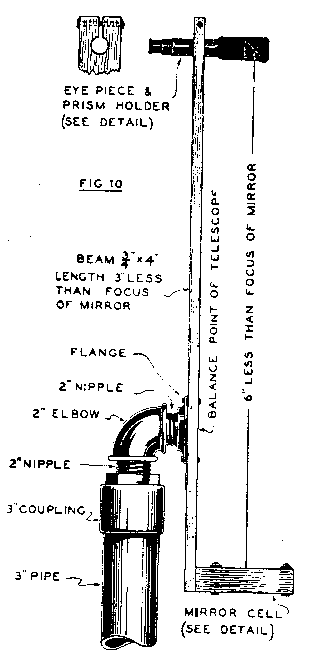
 The mount, shown in Fig. 10, is held on a 3 inch pipe, set in the ground and projecting about 2 feet above the ground. The 2 inch bushing is tapped straight, as is also the 2 inch flange. The ends of the nipples entering these fittings are threaded straight, so that the telescope will swing freely; vertically on the thread in the flange, and horizontally on the thread in the bushing. The other ends of the nipples are screwed firmly into the elbow.
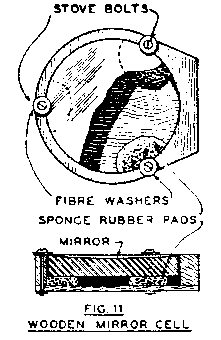
The mirror is mounted in the wooden cell (Fig. 11), being pulled back against some pieces of sponge rubber by 3 fiber faucet washers on 2 inch long stove bolts. This cell is screwed to the beam, at the other end of which is the prism-eyepiece holder, detailed in Fig. 12. When all parts are in place, the beam is balanced and the flange screwed on at the balancing point.
The prism-eyepiece holder (Fig. 12) is made from a piece of brass tube 1 and three eighths of an inch outside diameter, one thirtysecond of an inch wall, tube 6 inches long. First the sides are cut away as shown, and the remaining "ears" flattened. The stirrups are cut and bent from thin sheet brass to fit the prism. If a diagonal is used instead of the prism, these stirrups are changed to fit the diagonal. They are held in place and the prism or diagonal clamped between the "ears" of the tube by the stovebolt shown. The whole is clamped in the beam by the one eighth inch carriage bolt, as shown in Fig. 10. A short length of tube slides into this holder and holds the eyepiece, which is focused by sliding either the short tube or the eyepiece.
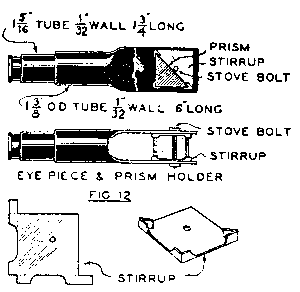 The center of the prism should be at the same distance from the beam as the center of the mirror and face it exactly. To adjust the prism, stand at some distance and look through the eyepiece tub (eyepiece not in place). Turn the holder in the beam, and also rock the prism or diagonal on it's stovebolt, until you see the mirror centered in the prism or diagonal, visible through the eyepiece tube. The mirror is adjusted at the same time, by turning the stove bolts that press it back against the rubber pads, until the image of the prism lines up with the prism itself, at the center of the mirror.
The positive eyepiece (Ramsden) is suitable for a reflecting telescope. A negative or Huyghenian eyepiece can be used but, because of the curvature of the image, it will not give as good definition at the edge of the field.
We advise that you buy a good eyepiece. The makeshift described here will serve, however, although definition will be good only in the center of the field.
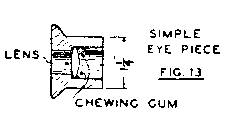 Fig. 13 shows an eyepiece made from a magnifying glass and a spool. The lens should be about three quarters of an inch in diameter and with a focal length of about one inch. The ordinary 10X (diameter) magnifying glass is suitable. The spool is bored out to receive the lens which is fastened in place with chewing gum.
The standard eyepiece diameter is one and a quarter inches, so (if convenient) use a spool of this size, in order that standard eyepieces may later be substituted for it. If a different diameter is used, a bushing will have to be made to fit the eyepiece tube (shown in Fig. 10, at the top).
The power of the telescope depends on the eyepiece that you use. Some day you will want a battery of at least three eyepieces, to give different powers. The most generally useful will be a 1 inch equivalent focal length, abbreviated as 1 inch EFL. With your 50 inch focus mirror, this will give a magnification of 50x. This is best for observing nebulae, star fields, and for variable star study. It can be used for anything. A one half inch EFL eyepiece will give 100x and is suitable for the planets, the moon and globular star clusters. A one quarter inch EFL gives 200x and is useful for separating close double stars and for the planets and the moon where greater magnification is desired.
Silvering
The front or concave surface of the mirror must be silvered. Several methods are in use. We have selected the simplest method that gives a satisfactory coat of silver. this is known as the King process from it's inventor, who was a member of the Harvard University staff.
Firs the mirror must be cleaned. A chemically clean surface is essential. Use rubber gloves and rub the concave surface hard with concentrated nitric acid and a cotton pad, held in the fingers. Do not allow the acid to touch the fingers. Rinse off the mirror under the faucet and clean in the same way, using this time strong ammonia. Rinse again and place in a pan under water until ready to silver. Do not touch the surface with the fingers or anything else; or spots will result.
The silvering dish should fit the glass closely, to avoid the necessity of using large amounts of solution. The mirror should be covered at least half an inch deep with solution. Glass or porcelain is best although a tin can be used if protected by a coat of hot paraffin applied with a brush. An excellent silvering dish can be made by passing a strip of heavy paper through melted paraffin to waterproof it, then wrapping it around the mirror, keeping the mirror still under water. This forms the rim of a dish with the mirror itself as the bottom. Tie tightly with a string and, if it leaks, touch the leaking point with a hot iron.
For a 6 inch mirror, dissolve a quarter ounce of silver nitrate in 170 cubic centimeters of water, and add strong ammonia with a medicine dropper. This will throw down a white precipitate. Continue adding ammonia carefully until the white precipitate just redissolves. Stir constantly, and do not add more ammonia than will just clear the solution. Cool to 40 degrees Fahrenheit.
In a separate glass dilute 7 c.c. of formaldehyde with 35c.c. of water. When ready quickly mix with the silver solution, and immediately pour off the water from the mirror, and pour on the silvering solution. It will turn black, and silver will be deposited. Rock gently to keep in motion while silvering.
When dark grains begin to form, pour off the solution, rinse the mirror in running water, and stand on edge to dry.
The silver surface is to be burnished the next day. this is done by rubbing very lightly, using small circular strokes, with a pad and fine rouge. The pad is made by tying a piece of clean soft chamois skin around a small bunch of cotton; it should be about an inch in diameter. Keep it in a covered jar, for the least bit of dust causes scratches in the silver. If the pad is rubbed on a dry, used pitch lap, the fine rouge remaining from polishing will charge the pad sufficiently. This burnished surface reflects more light than the silver coat as left by the silvering process.
If you live in a locality where the air is smoky or sulfureous, a thin coat of lacquer may be used to protect the mirror. The lacquer is made by mixing a small amount of collodion with twelve time as much amyl acetate. The lacquer is poured on the mirror, flowed around to cover all of it and then drained off; and the mirror stood on edge to dry.
While lacquer properly applied does not seriously injure a mirror, it certainly does not improve it, and should not be used except where the unprotected coat deteriorates too rapidly. The writer has unprotected silver coats several years old, which still are in good condition. The mirror should be covered with cotton pad when not in use. It should never be allowed to get damp or wet and, should this happen, allow it to dry before covering with the pad.
 In next month's installment of this article we will consider the construction of an equatorial mount with it's slow motions for following the stars as they rise and set, and it's circles, by means of which we can set the telescope on a celestial object even if too small to be seen with the naked eye. We will also treat of the used of the telescope; objects to be observed; and work that an amateur can do which is not only interesting but also of value to science.
In testing the mirror with the knife edge, if the shadows suggest a ditch around the "central island", the mirror is oblately spheroidal. Polishing with long strokes will first make it spheroidal, and then paraboloidal.
Note: Please note that the prices listed above are prices from the 1930's rather than today's prices. Things have gotten a lot more pricey as inflation has done its nasty work on our money.
Bob May.