John M. Pierce's Telescope Making Articles
These articles are reproductions from the magazine of the '30s, Everyday Science and Mechanics.
Making Small Lenses.
Part 4
The maker of a reflecting telescope, after he has finished his mirror must have eyepieces to magnify the image formed by the mirror. These can be either purchased ready-made, or made by the amateur himself. Still further reducing the cost of his telescope. The making of small lenses is not all that difficult, and it is possible with very simple equipment.
For glass, you can purchase blanks molded roughly to shape, thus reducing the necessary grinding; small lenses can be made from fragments of a spectacle lens; ordinary plate glass from a mirror or windshield can be used. In the latter case, you can use the already polished surface for the plane side of the planoconvex lens, leaving the other side to grind and polish.
First we cut our lens blank by grinding a circular groove in the glass, using medium coarse abrasive, about No. 220, and water, with a cutter made from an empty cartridge shell, a piece of brass tube or a pill box. The cutter is held in the chuck of a drill-press; and, using a medium speed, it is brought down on the glass, which lies on the drill-press table. Abrasive, wet with water, is fed to the cutting edge with a spoon. Raise and lower the cutter frequently, to allow the abrasive to get into the groove, which rapidly deepens, and cut out a perfect circle.
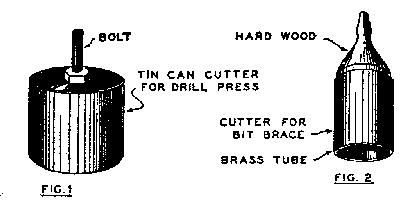 Fig. 1 shows a large cutter of this type, made from a tin can to which a shank has been attached. This cuts out two 4" circles from 1/2" glass in little more than an hour. If a drill press is not available, put in a square shank (as in Fig. 2) and use your bit brace. Clamp over the glass a 1/8" thick board with a hole of the right size, to act as a guide in starting the cutter.
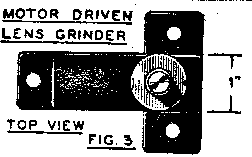
The blank is ground on a metal lap, shaped to the curve of your lens. This lap is usually rotated on a vertical spindle, turned by a motor. Fig. 3 shows a simple and satisfactory grinder; the laps are interchangeable for differently curved lenses. The speed should be about 1800rpm. The lens blank is pitched to a metal or wooden handle of about the diameter of the lens, and 1/2" long (Fig. 6). It is dipped first into water and then into the abrasive; and rocked back and forth on the rotating lap until the glass has reached the same curvature as the lap.
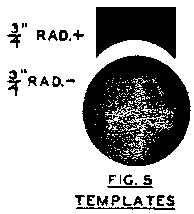
 Continue with finer abrasives until a fine ground surface is obtained, suitable for polishing. Before the final grind, re-form the lap to the correct curve, gauged by a template (Fig. 5). The lap should be a little larger than the lens; and the central part (about 1/8" diameter) should be removed so that it will not touch in grinding. A small hole, made at the center of the lap will be sufficient.
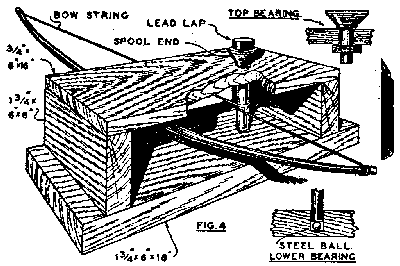
If you wish to be more primitive, use this system: drill holes into a piece of hardwood, 3/4" in diameters and 1" deep. Then pour lead into these holes to form lead buttons. Pound a steel ball (from a ball-bearing) into the top of the button, and use the button as a lap.
These may be pitched to the center of the upper wheel of a sewing machine, or may be held on a simple wooden spindle rotated by a bow, like a Boy Scout's firemaking spindle. Such an outfit is shown in Fig. 4.
All the ordinary eyepiece lenses are plano-convex in form. For such a lens, the radius of curvature is half the focal length of the lens. A steel ball half an inch in diameter will form the correct curve for grinding a 1/2" focus lens. A double-convex lens, having two curved surfaces, requires only half the curvature in each one; so a one-inch steel ball would make a 1/2" focus double-convex lens with a template (Fig. 5).
Consult the table of "Elements" given here for data on the types of eyepieces, and the lenses required. The "field" lens is toward the telescope's mirror or large lens; the "eye" lens toward the observer's eye.
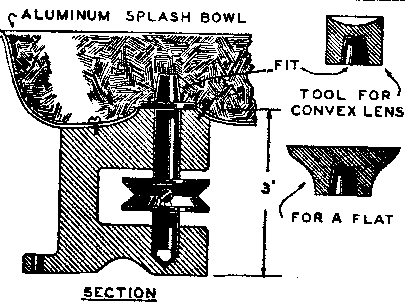
When you fine-ground surface is free from scratches, you are ready to polish. Clean the lap and dampen it with turpentine; then paint on melted pitch until it is about 1/8" thick. Rotate slowly, and form the correct curve with your ground lens. When cool, cut out the center with a knife; the center does little work, and truer curves are obtained if it is removed. You should also scratch a few circular grooves (while the lap is revolving) and trim the outside to the diameter of the lens. Dip the lens into rouge and water, and polish as if you were grinding; rocking the lens back and forth and around to give even wear. It should polish in about 15 minutes. WARNING: provide a guard for the splash thrown off by the rotating lap; or you will get color effects, not planned for, on clothes and wall.
If the lens is to be crimped into the cell, or in any way held by its edge, it should be centered. This is done as follows: = Pitch the lens to a piece of brass tube, as in Fig. 6. This is held in a lathe chuck, and turned slowly while you watch the beam of light reflected from the front and back surfaces of the lens. Heat the tube with an alcohol lamp until the pitch softens; and then press the lens with a forked stick until the reflections remain stationary while the lathe rotates. This shows that the lens is then on center with the axis of rotation of the lathe. The edge is then ground by bringing a piece of emery stone against it while it revolves. Wet frequently and continue until the edge runs true.
Types of Eyepieces
The eyepiece is a magnifier; it enlarges the image formed by the objective or mirror. There are positive and negative eyepieces. The focus of the positive is in front of the field lens; since the focus is outside the eyepiece, this type can be used as an ordinary magnifying glass to enlarge objects placed in front of it in its focal plane. The focal plane of the negative eyepiece lies between the two lenses; so it cannot be well be used to enlarge anything but optical images, which pass in through the field lens.
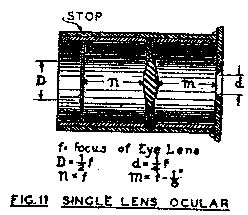 The simplest eyepiece is a single lens; the plano-convex type is best, as it gives less aberration than the double convex type. It should have the curved surface next to the eye. The single lens gives a very brilliant image; but only the center of the field is clearly defined, the edges being somewhat distorted. Stars in the edge of the field will also show considerable color; one side of the image being red and the other side blue. The eye must be held some distance away from the lens for a clear sight. See Fig. 11 for its elements.
The Ramsden positive ocular is recommended for use in reflecting telescopes; it is the simplest compound ocular to make. Fig. 7 shows a Ramsden in a simple wooden mount, with the lenses held in place with chewing gum. If care is taken to "square on" the lenses when seating them in the mount, this eyepiece will give excellent results. The Ramsden eyepiece consists of two plano-convex lenses of the same focal length placed with their convex surfaces adjacent.
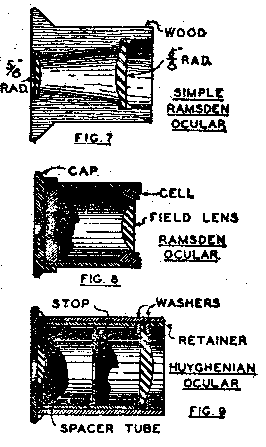 Fig. 8 shows a standard Ramsden ocular in section. The lenses are crimped into brass cells that screw into the tube. When the cells are turned in the lathe, there is left a thin edge or lip of brass which is later turned down to hold the lens in place. This edge is shown in the field-lens cell in Fig. 8, still uncrimped. Before putting in the lens, the brass should be blackened by heating to a red heat, dipping into a saturated solution of copper nitrate, and then reheating. Repeat if necessary. This heating also anneals the metal, so that the crimping operation is easily done. Screw the cell into the tube and place it in the lathe. Put in the lens, and hold it in with the finger, while the lathe is slowly rotated. The lip is easily turned down or "spun" by pressing it with a smooth piece of steel while it turns. Be careful to avoid scratches, and be sure that the lens is firmly crimped into the cell.
A mount that can be made without a lathe is shown in Fig. 9. It is made from brass tubing, which can be purchased,
| Fig. 16 |
|---|
| Elements of Huyghenian and Ramsden Eyepieces |
|---|
| Hugygen | Ramsden |
| EFL* of eyepiece | f | f |
| Diam. of field lens | f | f |
| Focus of field lens | 3/2f | 1 1/4f |
| Diam. of eye lens | 1/2f | 5/8f |
| Focus of eye lens | 3/4f | f |
| Separating of lenses | 9/8f | 15/16f |
| Diameter of stop | 5/8f | No |
| Radius of field lens | 3/4f | 5/8f |
| Radius of eye lens | 3/8f | 5/8f |
| * EFL - Equivalent focal length |
|---|