John M. Pierce's Telescope Making Articles
These articles are reproductions from the magazine of the '30s, Everyday Science and Mechanics.
The Scout Telescope
Part 7
Previous articles in this series have portrayed the construction of both reflecting and refracting telescopes. In the present installment, the author describes the building of the simplest of reflecting telescopes; nevertheless, thoroughly practical results may be obtained with it.
 Sir William Herschel was a very famous astronomer. He built many reflecting telescopes, from 4 inches to 4 feet in diameter, and made a systematic survey of the heavens. He discovered many double stars, star cluster, and nebulas of several forms, as well as the planet Uranus, during a long and busy life. He also invented a form of instrument, known as the Herschellian reflecting telescope, which eliminates the prism necessary with the customary Newtonian type.
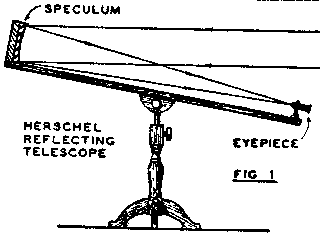
Herschel placed his eyepiece at the end of the telescope and pointed it at the speculum or concave mirror. By having the eyepiece at one side of the telescope tube, he viewed objects reflected at an angle from the speculum, as shown in Fig. 1.
Sir William Herschel was a very famous astronomer. He built many reflecting telescopes, from 4 inches to 4 feet in diameter, and made a systematic survey of the heavens. He discovered many double stars, star cluster, and nebulas of several forms, as well as the planet Uranus, during a long and busy life. He also invented a form of instrument, known as the Herschellian reflecting telescope, which eliminates the prism necessary with the customary Newtonian type.
Herschel placed his eyepiece at the end of the telescope and pointed it at the speculum or concave mirror. By having the eyepiece at one side of the telescope tube, he viewed objects reflected at an angle from the speculum, as shown in Fig. 1.
This telescope, when mirrors of the usual short focus are used, has a very serious fault: the object observed is several degrees of the optical axis, and this causes badly distorted images. With a mirror of long focus, however, excellent results may be obtained. Besides the advantages of simplicity and low cost, this type of telescope uses the entire speculum; while all others have the central part of the mirror (which is usually the best part of it) covered up by the prism or diagonal mirror or, in the case of the Cassegrain or Gregorian, by the convex or concave secondary mirror.
We will describe in detail the construction of a 4 inch Herschellian telescope of about 60 inch focus, which will give excellent service with powers up to 60 diameters. This is a magnification of 3600 times, when we consider the areas, and is sufficient to show the rings of Saturn, the moons and markings of Jupiter, the ice caps of Mars, the craters of the Moon, and many other astronomical wonders.
This telescope is designed for those who desire the simplest and least expensive instrument that will give good results. It is hoped that troops of Boy Scouts and similar groups will make use of it, and in their honor we name it
The "Scout Telescope"
The telescope consists of a concave mirror to collect the light of an object and bring it to a focus; a small lens to magnify the image; and a wooden bar to hold these parts in position. The bar is held on a simple stand, so that it may be pointed towards any part of the sky, and moved to follow the stars as they move across the sky. It can also be used for terrestrial objects, being especially good for watching birds and animals. Its power is so great that it brings the image of any creature at a distance of a hundred feet, up to within less than two feet. You can watch a bird building its nest in a tall tree, and every least hair that it handles, every movement that it makes, is as clearly visible as if your face were only 20 inches away from the bird.
For the concave mirror we will need:
- Two glass circles, 4 inch in diameter, and at least 1/2 inch thick.
- A quarter lb. No. 100 carborundum, or other abrasive
- 1 ox. each No. 220, 400, 600 grit and optical rouge
- A quarter lb. optical pitch
The glass circles can be cut from a plate glass mirror or a piece of windshield but will be much better as well as easier to handle if at least half an inch thick.
Fasten one piece of glass to the work bench with a little melted pitch. If the work bench is varnished, tack to it a piece of unpainted board; as pitch does not stick well to a varnished surface. This stationary glass disc is the tool. Sprinkle on it a quarter teaspoonful of the coarsest grit (No. 100); add a like amount of water to moisten it; place the mirror disc on top; and grind by rubbing back and forth, using a stroke about 6 inch long, and considerable pressure.
Rotate the glass in the hand between strokes, about 1/12th turn at a time, and vary the direction of the stroke across the lower glass so that grinding will be uniform on all diameters (mounting the tool on an inverted barrel, and walking around it, as you work, is a good method for grinding operations). As the grit wears out, add more; also water as needed. At the end of 15 minutes, wash and dry the mirror and lay a straight-edge across the ground surface; you will find it to be concave. Continue to grind until you can slip two thicknesses of a postal card under the straight-edge at the center of the mirror. This measures the right concavity to give about 60 inches focal length and is about right; Herschellian telescopes require a long focus mirror.
Next wash the glass thoroughly, so that no grains of the coarse grit will be left to scratch the fine-ground surface you are now going to produce. Then grind with the No. 220 grit, suing a short stroke - about 1 1/2 inch long over all - 3/4 inch over the edge at each end of the stroke.
This short stroke will be used from now on in the grinding and polishing. Except for the length of stroke, the movements are the same as in fine grinding and polishing as in rough grinding. Grind for 30 minutes with the No. 220 and No. 400 and for an hour with the No. 600; washing up carefully between each grade.
We are now ready to polish. Place the mirror in warm water while you make the polishing lap, as follows: melt some pitch and after it has cooled enough so that it flows slowly, pour it on the clean dry tool, as the lower glass is named. The pitch should be cool enough to lie on the glass about 1/2 inch thick. Allow it to become cool enough to hold its shape, but not too hard to mould easily. Take the mirror from the warm water, and press the pitch with the wet ground surface until the pitch has the exact curve of the mirror. Keep the mirror warm or it will stick to the pitch. With a sharp point of a knife scratch the surface of the pitch into 1/2 inch squares, to break up the large surface and reduce suction when polishing. Mix a spoonful of rouge in a quarter-glass of water and, with a swab or brush, paint the ground surface of the mirror. Place this on the pitch lap, and polish; using the same strokes and motions as in fine grinding. Repaint with rouge as it becomes dry, and continue this for from 6 to 12 hours until the ground surface becomes perfectly polished. The mirror is then complete, except for applying the coat of silver. Scratches, while injurious to the pride of the maker, do not seriously affect the performance of the mirror in the telescope.
The concave surface of the glass is to be silvered. This mirror differs from an ordinary looking-glass, in its being silvered on the front surface of the glass.
First, wash the mirror with soap and water, and rinse thoroughly; then swab with strong nitric acid (use rubber gloves!). Use a cotton swab, and rub with considerable pressure. The glass must be chemically clean, or the silver will not deposit in the bright, even coat necessary. Rinse again in several changes of water, and place in a soup plate of water to remain until the silvering bath is ready.
Dissolve a quarter-ounce of silver nitrate crystals in a glass of distilled water.
If no distilled water is available, clear rain water is suitable; in many places the ordinary tap water may be used successfully. To the solution of silver nitrate add strong ammonia with a medicine dropper. A grayish-brown precipitate will be thrown down first. Continue to add ammonia and stir with a glass rod, until the precipitate is just redisolved. Use only enough ammonia to clear the solution and no more; for an excess of ammonia interferes with the silvering process. To another glass mix one teaspoon of formaldehyde with a quarter glass of water. Mix this with the silver nitrate solution in a soup plate; and place the mirror in it, face up. Rock gently until a good silvered surface is formed on the mirror. Then remove the mirror, rinse it in clean water and stand on edge to dry. Do not allow the mirror to remain too long in the silvering bath or a dull coat will result. Use rubber gloves all through the silvering process, as the chemicals used are injurious to the hands.
If the first attempt is a failure, try again. Be especially careful as the cleanliness and the amount of ammonia used; these are the most frequent causes of failure. If, when the silver nitrate was first dissolved, the solution was not clear and colorless, the water used was probably not pure enough. Use only the best and purest chemicals. The ammonia should be purchased at the drug store, and is what the druggist knows as "stronger ammonia". Ordinary laundry ammonia is not suitable for silvering; it probably contains borax or other impurities.
The silver coat may be protected by a coating of clear lacquer, made by dissolving a spoonful of collodion in 12 times that amount of amyl acetate (banana oil). This lacquer is poured on the mirror to cover the silvered surface, and drained off immediately by standing the mirror on edge to dry. The silver coat should be thoroughly dry before lacquer is applied.
After lacquering, the mirror will be covered by several bands of "soap bubble colors". These do not color the object observed in the telescope; the rays of light from all these colors unite in the image to give a truly authentic color.
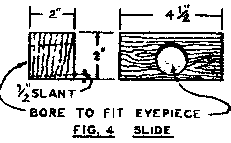
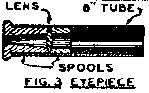
The eyepiece (Fig. 3) is mad by holding a small magnifying glass between two wooden bushing in a brass tube. Sections cut from spools are suitable for these bushings, if the holes are enlarged either by boring or by burning with a hot iron. The lens should have a focal length of about 1 inch, and should be placed about 1 inch inside from the end of the tube. When the eyepiece is in place in the slide, it should point towards the center of the mirror. It is focused by sliding it in the slide (Fig. 4).
In making the slide, bore the hole for the eyepiece and then plane or saw the bottom on a slant. Glue and nail it to the end of the bar; cutting through the bottom of the slide into the eyepiece hole. The 1/4 inch x 5 inch bolt and thumb nut, passed from side to side through the bar, is to compress this slit and so clamp the eyepiece after it is correctly focused. See Fig. 2.
The mirror back (Fig. 6) is cut out and a circle drawn on it to represent the mirror; the 3/16 inch holes for the stove-bolts are then drilled just outside the circle. This piece is glued and nailed to the bar at the opposite end from the slide.
The bar is a good straight piece of dry wood, 3/4 inch thick 4 1/2 inch wide and 2 inch longer than the focal length of your mirror. To find this focal length, stand in a darkened room facing an open window, and with the mirror throw the image or reflection of some distant outside object upon the wall beside the window. Move forward and backward until the image of the distant object is in perfect focus on the wall. Prop up the mirror on a stand in this position and measure the exact distance from the center of the mirror to the image on the wall: this is the focal length of the mirror. The distant object should be at least a half mile away. The bar should be 2 inches longer than this measured focal length.
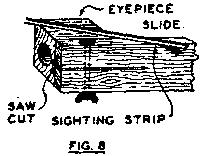 After the back is in place, the mirror is fastened to it with the fiber washers and stove-bolts. Place the eyepiece in the slide; lay the telescope on a table, and point it towards some object of interest. Focus by sliding the eyepiece in its slide. If you will sight along the bar, you will discover that it is not pointing at the object in the center of view seen through the eyepiece; this is because, in this type of telescope, the line of sight is at an angle. A small triangular stick, about 9 inches long and painted white should be nailed across the bar and the end of the slide in such a position that it points at the object seen in the eyepiece. See Fig. 8. This is very necessary in pointing the telescope at stars or planets at night.
The bar should now be balanced, by placing it on a pencil and sliding it along until it balances. Mark the balance point, and, at that point, bore the 3/8 inch hole for the horizontal axis.
The block (Fig. 5) should now be made from a piece of hardwood and the mount assembled. The 3/8 inch bolt that forms the horizontal axis and the 3/8 inch rod that forms the vertical axis should both be polished down until they are an easy fit in the block. The nuts should be adjusted to allow easy yet firm motion. Oil on the rod, and soap where wooden surfaces rub, will make the telescope move easily in picking up and following a star. A brass or zinc washer, 2 inches in diameter with a 3/8 inch hole, placed between the block and the bar on the horizontal axis, will reduce friction on that axis.
The telescope should be painted a dead black color to avoid reflections.
The materials needed for the mount are as follows:
- A tube 6 inches long
- A an eyepiece lens
- A two wooden bushings
- A slide 2 inch x 2 inch x 4 1/2 inch wood
- A mirror back 1 1/4 inch x 4 1/2 inch x 5 1/2 inch wood
- A block 2 inch x 4 inch x 8 inch wood
- A bar 3/4 inch x 4 1/2 inch wood, as required by the focal length
- Carriage bolts:
- 1/8 inch x 5 inch
- 1/4 inch x 2 1/2 inch
- 3/8 inch x 6 inch
- three stove bolts 3/16 inch x 2 inch
- three 3/16 inch nuts
- three fiber washers 5/8 inch diam.
- steel rod 3/4 inch x 18 inch for the vertical axis
- two 1/4 inch thumb nuts
- two 3/8 inch hex nuts
- two 1/4 inch washers
- 3/8 inch washer
A 3 inch pipe, set in concrete, makes a good pedestal for this telescope. Fill with thin mortar and, while it is still soft, put in the vertical axis; bracing or tying it in place to hold it until the cement sets. A portable mount, for use on hikes, is shown in Fig. 7.
When not in use, a waterproof bag should be drawn over the mirror. If this is done, the silver should last for several years before needing replacement.