Making a Dental Stone Tool Method of grinding of a mirror.
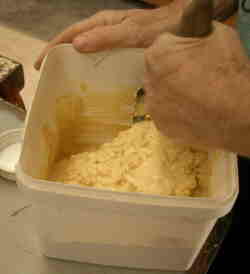
With this method, the first thing is to mostly grind out a roughly spherical hole in the mirror with a piece of iron (or other metal if desired) that is usually in a ring shape and then you make the Dental Stone tool and finish the grinding with the Dental Stone tool that you make.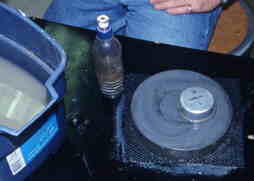 We start this by putting a good sized pinch of the coarsest grit that you have (usually the 80 grit - larger grit is only for huge mirrors) and a few drops of water (we'll call this a "wet") on the piece of glass selected for the mirror and take the iron end cap (as an example of a cheap source for a ring tool) or other metal piece and start pushing it around on the glass. The photo at the left shows a start of a grind and also a grit hottle to the left of the mirror and a bucket with water (dirty from cleaning the mirror) to clean the used grit off of the mirror. You will hear a loud grinding sound which is normal. At the beginning, you can go over the whole surface just to smooth it out a bit if desired. Spend most of the time in the middle of the glass as this is where you will need to remove most of the material. Remember that the center is going to be the deepest so you will need to grind there the most. Don't work in just one small area though or you will not make the surface very spherical. You will quickly see that the grit becomes quieter in it's sound and the grit starts looking a medium grayish color. This is the point where it's time to quickly wash off the old grit (you don't need to get everything off, just most of the grit and glass fragments) and put on a fresh "wet" of grit and do some more grinding. The gray color is from the glass (pretty much a white color at that size) mixing with the grit. After the initial reduction in sound level, you may want to wipe around the sides of the mirror and pick up all of that grit that you pushed off and put it back on the face of the mirror again. Do this only with this coarse grit and you will be able to go farther with the grit that you have. Don't do it with the finer grits as you may pick up a piece of dirt and thus make a scratch on your almost finished mirror. For reference sake, here is a short AVI movie of what not to do!
One of the things you may want to make if you're a detail nut is a cardboard, wood or plastic template of the radius of the mirror you're going to make. You can do this by using a string attached at one end to a nail and a pencil (or pen) on the other end the distance apart of the radius that you're going to make on the material you've selected and then cut the curve out by whatever means best for the material. You want the convex curve in the material to mate to the mirror for a regular newtonian mirror. Regular use of the template will insure that the hole is pretty spherical and give you a rough idea of how deep you are. If you really want to keep track of your depth, you can also make a spherometer. There are several places on the web where pictures, and even some plans, of spherometers are. They aren't hard to make if you have a lathe but they do want a good dial indicator or micrometer head in order to work well. You may also want to do a bar style spherometer if you can't make a 3 point one. I'll note that the larger the diameter is for a spherometer, the more accurately you can measure the ROC. A large spherometer with a 0.001" indicator can be more accurate than one smaller in diameter with a 0.0001" indicator.
Measure the Sagitta of the hole you are grinding as you go and when you get to about .010" or 80% (whichever is smaller) of the final value it's time to make the Dental Stone Tool and finish the grinding. The butt end of a drill or a feeler gage can be used to test for the correct depth along with a straight metal ruler if you don't make a spherometer. Remember that you want to make a spherical surface and you may want to measure the depth you are doing in more than one place to insure that you are indeed getting something resembling a sphere. The accuracy doesn't need to be all that great but the shape shouldn't be a hole in the middle of the glass and the outer 1/2 be a flat surface that hasn't been hardly touched.
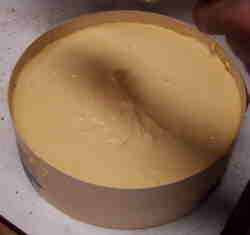
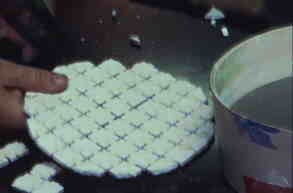 After you have the mirror carved to about 80% of the depth, we'll start making the Dental Stone (any dental supply place will have the stuff for between $15-$25 for 25lb. as well as places like Gotgrit.com for smaller quantities) tool by placing the tiles on the mirror and trimming any tiles that are over the edge of the mirror. The photo at the right shows a tool ready for the first grind. For reference, the Dental Stone got mixed up approximately 1/2 hour before this photo was taken. Other photos in this series are all of the same tool and were taken within a half hour of each other. Note that other materials like Hydrostone or Tuffstone (products of US Gypsum) are equally good for this job as they are water resistant (water gets into the stone but doesn't affect the material - it's called water resistant as water does get into the material and freezing or heating it may cause the stone to break) and will work just as well. I don't use them only because the 100lb. bags are a bit harder to store in the limited area that I have to store such stuff.
 Putting some soap or salad oil on the mirror's surface will help to release the tool from the mirror when we're done. We do want the tiles to go as far as they can to the edge of the mirror without hanging over the edge. If you do this with the Dental Stone dam already in place then you will know what the edges of the mirror are and you won't go over the edge of the tool with the tiles. You don't have to exactly fill out to the edge all the way around either with the tiles. If desired, you can just use whole tiles to fill out the area of the mirror. Don't make the edge tiles too small or they will just break out if they are at the edge from the inability of the Dental Stone to hold them. You can either crunch the tiles closer together to make them fit or cut them with a tile cutter, it's your choice. The tiles should be laying down flat on the mirror or the Dental Stone will quickly flow underneath the tiles when you do your casting. Also you won't have a good tool as there will be major parts of tiles that don't mate to the glass.
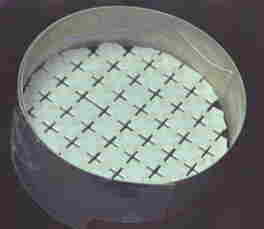
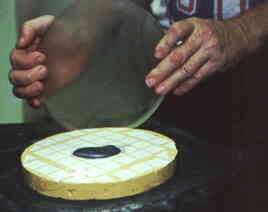
After the tiles are sitting on the mirror, it's time to make the dam to hold the Dental Stone you're going to pour. The cheap and dirty way is to just use some aluminum foil or such thing and hold it on with duct tape. For really cheap, just duct tape is ok but you may run into the stuff grabbing itself and making it hard to get a nice looking tool. You do want to make the tool about 1:6 to 1:10 ratio or so for thickness to diameter but don't get to picky as that's just an approximate size. After you're happy that the dam will hold the Dental Stone you can put the tiles in the bottom of the cavity you have now made. If you desire (advised), you can use some soap, cooking oil or other mold release stuff to keep the Dental Stone from sticking to the mirror and holding down the tiles.
 Mix the Dental Stone so that it is a moderately stiff mix (the approximate method) or, if there are specific instructions for the ratio of Dental Stone to water, use a scale to measure the water to add to the Dental Stone. Mix the Dental Stone well and make sure that there aren't any dry chunkies in the fluidized Dental Stone or thick parts in it or the Dental Stone won't cure properly. You have about 2-3 minutes maximum generally to do the mixing and pouring for a typical 10 minute set time stone.
WARNING!
Dental stone is a FAST curing plaster!
The working time on these plasters are on the order of 5 minutes and that means that the plaster MUST be in the mold and you are done playing with it within that timeframe. It is just like 5 minute epoxy with its 1 minute working time! Be prepared to do all of the things necessary before you start putting water in the plaster as that pouring of the water is the start time! In addition, the stuff is totally hard in about 20 minutes after the water is first applied to the powder so plan ahead and work fast!
Ya got warned!
 When you have the Dental Stone mixed thoroughly, pour some into the dam and then shake or bang the Dental Stone down a bit and then pour the rest in. Try not to make large bubbles with the pour. After pouring, pound or otherwise vibrate the mirror lightly on the table to get the bubbles that you did get into the mix out of the Dental Stone. Don't get to rambunctious or you may get the tiles to lift off of the mirror and then it will take a lot longer to mate the tiles to the mirror. Just a couple of gentle whacks on the table top is quite enough to make the bubbles float up and away from the surface of the tool and make the backside of the tool fairly flat.
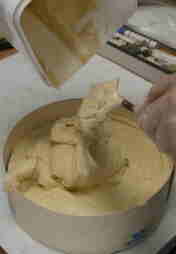
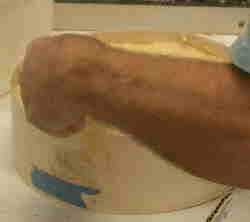
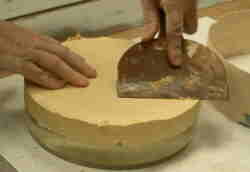 After a bit you will notice that the Dental Stone is getting warm. This is what Dental Stone normally does and it will usually get warmer than about 120F or so. This heat is from the chemical action of the hydration of the Dental Stone and is quite normal. The heat is from the Dental Stone setting up and shortly after the tool gets as warm as it gets, and you can scratch the backside without having water well out of the Dental Stone after you make the scratch, you can start removing the dam. At this time, the Dental Stone is soft but will hold it's shape if you don't stress it. After getting the dam off, it is then the best time to get the back of the tool flat enough to not rock when you use it on the bottom as the Dental Stone is still quite soft. Take a flat edge and just scrape the backside. Be a bit careful with the tool as it has no real strength yet. It is also a good time to separate the tool from the mirror after you have done initial flattening of the backside. The time taken from the pouring of the Dental Stone and the carving time is surprisingly short and is usually on the order of about 5 minutes or so after the Dental Stone becomes stiff. Tile tools, as I make them with Dental Stone, are hard enough to start grinding in about a 45 minutes after the stuff is initially mixed.
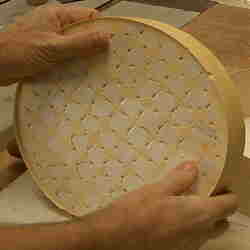
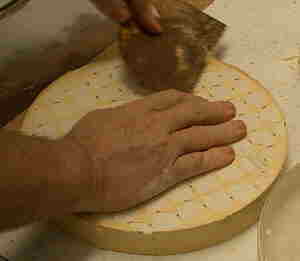 Let the tool sit for a day or two to fully harden if you desire but this isn't needed. You can use it right away but the Dental Stone isn't up to it's full strength yet and you may knock an partial edge tile loose if start too soon if you get rambunctious with it. Treat it gently for the first hour and it will allow you to work with the 80 grit very nicely. The tool at the right is ready for its first wet. Note that the Dental Stone is somewhat over some of the tiles. This is just fine as the first two grits will work all or most of that Dental Stone off of the tiles. Also note that at this time, the glass isn't spherical as it has only been ground with the ring tool and the localized grinding of that tool can't get the surface good and spherical. The tool, being a copy of the glass, is also not spherical and thus needs some grinding, along with the mirror, to gain the spherical state.
Typically I make a tool in about 30-40 minutes from the time that everything is pulled out until the tool is off of the mirror and the back is cleaned up so that the tool will sit flat on the table top. I wait another 15 minutes or so and am then grinding with it. With the dental Dental Stone that I've been using (ordinary yellow dental stone at about $18 (with tax) a 25lb. box - 2001 prices) it is possible to start grinding with the 80grit to finish the sphericalizing of the mirror - just take it easy as the Dental Stone isn't all that hard yet.
If there are bubbles or places where the stone didn't get around the connectors for the tiles and such, you can mix up a little bit of the dental stone and fill them in as desired. The other thing that can be done at the 25 micron stage if you start getting scratches is paint or otherwise capture the grit that is in the bubbles. Don't bother to fill in low tiles as there isn't a good enough bond to the tile in such places to stay put while you're grinding and you really don't want to have a part of the tool suddenly lift while you're in the middle of the finest grit just before you go to polishing. Do wait until the additional stone is finished setting before grinding. Also, don't worry about high spots of the stone when doing this as the 80 grit will very quickly knock the high spots into compliance.
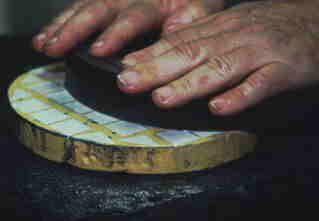
 Now that you have the tool made, you can now finish grinding the mirror with the tool using the roughing stroke with the mirror on top of the tool. You will need to get all of the tiles in contact with the mirror at this point and you may have to do a little bit of extra grinding in order to insure that all of the tiles are in contact. If the radius starts getting too short, you can lengthen the radius by putting the tool on the bottom and the mirror on the top. Please also note the position of my hands with the fingers above the edge of the glass and not curled down over the edge. This helps to prevent TDE when you get to the polishing state.
As soon as all of the tiles are showing at most of their surface is ground, you can call the tool and mirror properly mated and you can start down through the grits. You're then done with this section and can go and do your fine grinding. Please note that sometimes a few tiles may float up a bit and if this is so, don't worry about them being depressed as the tool will work just fine as it is.
As a little note, I've seen the sealed Plaster of Paris tool with tiles pasted on top of method and consider it to be a long hard job of work compared to this method, especially when the tiles (which are epoxied onto the sealed plaster tool) get worn too much and you then have to replace them with fresh tiles which means remating the tiles to the glass. The problems besides the excessive wearing of the tiles while doing the initial carving of the hole in the middle is that any damage to the epoxy coating of the plaster will allow water to enter the plaster and that will cause the Plaster of Paris to quickly degrade back to wet dust. Better to use a better grade of plaster or stone that is waterproof so that you don't have to worry about water in the tool. In addition, putting the tiles on top of the surface of the tool makes for big cavities that the grit just falls into and doesn't get used. The initial desire of grooves is to provide a resovoir of grit to refresh the stuff on the surface but that means shallow grooves rather than deep ones so that the grit does get moved up to the grinding surface. Another problem with tiles on top is that the edges of the tiles can shatter (especially bad during fine grinding) and produce nice scratches on the mirror. Better to bury the edges with the plaster and thus support them so that the shattering doesn't happen. If you want grooves in the tool you can always carve them as part of the making of the tool while it's soft.
Once the tile tool is mated to the glass and the glass is spherical then you can start using the tool with the finer grades of grit.