Finally, Polishing and Figuring your Mirror.
Now it's time to put away all of your grits and thoroughly wash your work station, mirror and tools. Any grit that pops up now will make you go back and grind for a while more and you don't really want to do that! Make sure that the spray bottle that you've been using is VERY well cleaned of any grits that may be in any of the crevices of the bottle's spray apparatus. Don't forget the bottom of the sprayer bottle also.
After everything is nice and clean, you can now pull out the Cerium Oxide and prepare it. There's a lot of different ways that people use to transport the stuff from the container to the lap. My personal preference is to make a thick paste with it. Others make anything from that to a thin wash with water. Professionals use a thin wash as they generally recycle the Cerium Oxide and water over the tool as the machine does the work. A paste allows for the placing of a little bit on the mirror or lap and then thin it out with water from the spray bottle as needed. Another jar is used for the paste or you can use a dropper bottle if you want to use a thinner mix. For the start, I would recommend that you do at least a thicker mix as you first have to make the lap and that requires that the Cerium Oxide be used as a release agent and thin mixes just don't work as well in that regard. Pour some of the Cerium Oxide into the dropper bottle and add water to get the consistency that you want and then add a drop or two of detergent to the mix. Carefully place the extra Cerium Oxide back in safe storage (you don't want to get any dirt or grits in it as that will cause you no end of problems with scratches on your mirror). At this point, if you plan on using pads to do the initial polishing, you will want to
go here for the information on doing this for the preliminary polishing of the glass. Please note that the pads are only used for polishing the glass quickly as they don't provide for the flexibility that pitch does for making a parabolic surface. At best they make a spherical surface.
Note, in the next part where you warm the pitch, you may want to do this outdoors as pitch does tend to smell quite bad. The less you heat it, the less the smell though.
Now pull out the pitch and place the open container in a pan of boiling or near boiling water and wait for it to melt. Mix every now and then to help in the process after the edges get fluid and the center is still solid. Don't eat the stuff or get it on things that will transfer it to eating things as the stuff is a very good laxative! While waiting for things to happen, you might also want to make your Couder Mask at this time so you can test your mirror when the time comes. You might also want to get your copy of
the TEX program here
so that you can automate your calculations of the test results. TEX is a DOS program but it's not hard to use.
Also you need to place the mirror and lap in another pan of water and warm them up also. You can boil the water in that pan if you want to as you do want to get the parts hot so that the lap attaches well to the lap. If you made a plaster lap, keep the ground surface of the tool pretty much out of the water as you are going to have to dry it completely off when you pull it out of the water in order for the pitch to attach itself to the tool. I usually use the microwave to warm the tool up as the retained water will be heated and then driven off from the tool. Be careful that you don't overheat the tool as water in the interior can and will vaporize and explode the tool if you get it too hot. I find that it takes about 15 minutes to warm a 1" thick 8" tool. You may also want to make a dam with some tape to restrain the excess of the pitch from falling off of the edges of the tool. You will want to make a lap of at least a 1/4" tall so your dam should be at least this tall. Don't worry if the tape is higher than the surface of the pitch as it won't scratch the mirror or disfigure the lap in any way when you pour the lap.
After the pitch gets to the point where it's all a thick viscous liquid, it's time to pour it on the tool and make your lap.
While you're waiting for the pitch to melt (don't get it too hot or keep it hot for too long or it will lose it's volatile parts faster and thus get harder), there's some chores that are needed to do. You need to first make a dam around the mirror with the tape to about 1/4" - 1/2" to hold the pitch on the mirror and then coat the mirror with Cerium Oxide mix. The coating is done by putting some of the mix on the mirror surface and add another drop or three of detergent (what can I say, I love the way that the stuff works with pitch as a release agent) and spread it around on the mirror, coating all of the top surface well. If you have a mold for making facets, you will also need to coat it with the same detergent mix as what you put on the mirror so that it doesn't adhere to the pitch which is really a pretty good glue as far as attaching itself to things (you've probably already learned this from trying to mix it up).
If everything seems ready then lets do it. Let the pitch cool if necessary until it pours like molasses in January (about a 1-2" thick wave) and pour the pitch on the lap. Quickly put the mirror on top and squish the pitch down until the entire mirror is in contact with the pitch. If you're not using a mold for the facets, pull the mirror off of the pitch and use the ruler or other tool you have selected for the job, press deep lines in the pitch so that it makes facets about 1/4" to 1/2" in size. Don't bother being accurate as to size as you do want some randomness in the sizes and exact locations of the facets. There's only one rule doing this and that is that you don't want a groove across the center of the tool or a facet squarely on the center. You don't even need to have all of the facets exactly the same size. After pressing in the grooves to make the facets, put the mirror back on the lap and press until the facets are pretty much back in full contact with the mirror. You may have to go back and press the grooves a second time if the grooves close up too much. Set everything aside to cool down. After the pitch is barely warm to the touch, you can start pushing the mirror about on the lap to verify that it isn't attached to the pitch. You can pretty much see where is may be attached as those spots will appear to be the black of the pitch and seem to be a "wet" type appearance. If you see that happening, the quicker you get the mirror off and a fresh coat of Cerium Oxide applied, the better off you will be. If you used a facet mold then slide the mirror off and remove the mold, being careful not to tear the mold as you will indeed want to use it again. You also want to let the pitch cool well so that there is no interior heat or the bottom of the pitch will flow and the blocks will sink into it and the channels will close up rapidly.
If you want, you can get some stuff that we call micromesh but is actually the mesh type stuff that women used to wear with hats to cover their face with a thin mesh. Just make sure that you wash the stuff thoroughly before you use it as you don't want any dirt to get into the lap. Let the lap cool a bit and then apply that over the facets so that it sinks most of the way into the facets. Remove the micromesh after the lap has cooled to where it is only warm. Also insure that the pitch doesn't flow over the mesh or you will be cracking pitch as you pull the mesh off.
I use another method of doing the pitch lap. I take and put the tool in the microwave with about enough cracked pitch blocks on it to make the lap and then heat the mess slowly in the microwave (I do love that microwave!) and the tool gradually warms the pitch up (it does most of it's heat from the tool) and melts on the surface of the tool so you end up playing with it a bit to get it all heated, flopping the cool part over so that it gets warmed by the tool faster. After it's all good and sloppy, I then apply the mirror and mold (with a good coat of soap, CeO and water) to the top and press the surface to shape. Micromesh of some kind is usually applied so that a good surface is obtained. The water on the mirror and mold will help in getting the top part of the pitch heated in the microwave if you need more heat.
 After every thing has cooled, it's time to start polishing and the stroke you use is about the same as the one you used for going down through the grits. There are three modifications to the stroke, you want to do about 1 stroke out or back per second, the side to side should be much less than what you were doing - almost no side stroke - and you want a somewhat shorter stroke of about 1/4 (total motion, not from the center) of the diameter of the mirror. Don't forget to keep turning the mirror and walking around the barrel as you do your stroking. If you don't, then you end up with a nice astigmatic mirror. For example, if you're doing a 8" mirror, the mirror should overhang each end of the stroke by 1", not 2" with a total stroke length of 2". If you have the mirror on top, you will probably see after about an hour of work that the center (but don't worry if some other area is getting most of the polish) of the mirror is getting polished. It would be a nice time to see with the eyeloupe what the polishing looks like. You will notice that there are large areas of a flat surface and scattered about are pits in the surface with the eyeloupe. This is the way it looks and the surface is perfectly normal. The peaks have been shaved off and the valleys are getting filled. If you are having problems with focusing on the surface of the glass, the best way that I have found is to start at the edge of the mirror surface and focus on that edge and then proceed inwards to look at what you want to.
 If you did pad polishing, you will be just getting the mirror flattened into a nice spherical shape and this should happen in a few minutes. After you get a sphere, you can then start parabolizing the mirror.
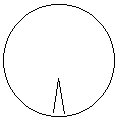
If you find that you have a turned edge, one easy stroke to do is to do as indicated in the illustration to the right. Start the stroke with the mirror about 1/3 to 1/2 from the center and go to the center of the tool - don't go past as that will then aid in making more of a turned edge. You want to put your hands one in front of the other instead of side by side and the pressure goes on the edge of the lap. You have to quickly go around the barrel doing this as the pitch will quickly roll down at the edge with this stroke. When you are done getting rid of the TDE, make sure that you do a warm press to insure that you have full contact with the lap again. Repressing every half hour is also wise to insure that the lap doesn't stop being a good surface. Severe cases of TDE can also be cured by making a small lap of about 1" or so diameter and working on the area of the mirror just inside of the bad edge. This will work the area just inside the edge down and make the finishing with the fullsized lap a lot easier.
When you want to stop for the day, put a non-contacting cover over the lap (a large pan is good) and store the mirror where it won't get any dust on it. Another method that can help quicken the time to start is to put it in a Tupperware type container with the mirror on top and a wet rag over the two pieces and seal the container. Be careful with this second since the drying of the lap will attach the mirror to the lap and if you can't separate them by putting them in a bucket of water for a while (5-10 minutes) then you get to make a new lap! Then there's the problem of the pitch flowing too fast and closing up the grooves in the lap so watch for that. If you do use the second and the mirror bears directly down on the lap then you can start polishing immediately. Note that the adhering of the lap to the mirror is worst if you don't have enough Cerium Oxide on the lap and you don't have a drop or two of dishwashing detergent in the mix. Having the microfacets from the micromesh also helps in making the release of the mirror from the lap a lot faster. If the mirror really gets stuck, there's two final ways of getting the two apart - melt the pitch or put the assembly in the freezer and freeze the pitch off of contact with anything. Pitch has a lot higher expansion coefficient so it will quickly release itself from the glass with a few warming/cooling cycles from the freezer to the refrigerator sections. You can reuse the pitch if you want or need to make a new lap.
Every time that you start a polishing session you should make sure that the mirror and tool are in good contact with each other by placing a moderate weight (you can use the bucket about half full of water as a weight) on top of the mirror to do a cold press for about 15 minutes. If you have been keeping the mirror and tool together in a container with a wet cloth over them, you can consider that the two are in good contact and you can proceed with polishing. If the mirror and lap aren't in good contact you will have to do a warm press and the quickest way is to get some hot water and put the lap in the water for about 30 seconds. You will also want ot warm the mirror up in that water first. Don't forget to make sure that the mirror has a nice fresh coat of CeO or it may stick to the lap!
Continue polishing the mirror until the edges are pretty much free of the pits. At this time, it would be good to set up the Foucault tester and check out what kind of surface you are making on your mirror. Don't despair if the surface is strange as most mirrors don't polish out perfectly in the beginning of polishing. I've seen what appear to be huge holes and mountains in the surface shape from initial polishing but they should disappear as the polishing goes along. For some reason, the surface during the initial polishing usually ends up being all kinds of strange shapes. Doing the initial polishing with pads does even more interesting shapes and a good indication of your rotating the mirror on the tool is how even these shapes are in the revolution of the figure. I've even seen rings formed that were of as much as .1" difference of radius from the rest of the mirror . Don't worry about any of these strange shapes at this time but if you want practice in the use of the Foucault test, now is the time to play around and see what the test shows. The only thing that you have to worry about at this point is whether the edge of the mirror is "turned down" (the radius of curvature of the edge is longer than the rest of the mirror) as this will mean that you will need to put the mirror on the bottom and polish that way. If this doesn't cure the problem, then you will need to remove the outer 1/2" of the radius of the lap to reduce the problem. Another cause of a turned down edge is polishing at too high of a speed.
There are a number of tests that can be done for seeing if the pits are gone. Most obvious is to just look at the mirror and see if the surface is polished with no dusty looking stuff on it. This works for some but it is easy to not see fine pits. Another way it to use a eye loupe of at least 5 power and see if there are any pits on the surface. This works well, especially in bright light where the pits will provide the bright specular reflections that will show the pits up. Some use a pointer laser or other bright light source, however I don't like that method as the laser can easily miss a pit once the polishing is almost done and dust on the mirror tends to give the same results as a pit does. As a result, I really don't like seeing the laser pointers for this job. Another test that I do often is to put the mirror on the Foucault test stand and shine the finder LED on it (the finder LED is a bright red LED that I use to locate the mirror's return beam and thus allows me to quickly setup the Foucault test on a mirror) and when you look at the mirror just outside of the returned image, the frosty areas of the mirror show up very nicely. Another method is to shine a bright light through the glass (works best when the backside of the clear glass is at least semipolished) and you will see the pits showing up. A variation of that is to shine the light through the side of the glass and that makes the pits really bright as the "lightpipe" effect happens and the pits interrupt the lightpath through the glass and shine bright. Make a choice of method for finding pits after checking out the various methods given abobe and get familiar with it. I'll also note here that the bare glass reflects about 4% of the light which hits it straight on and that percentage rises as the glass is angled to the ligh. Thus, you have to be careful that you don't mistake the natural reflection of a test like the laser pointer test to be misconstrued as to what a reflection from a pit is and what isn't.
Once you have started a polishing session, spend at least an hour or so at it as this will be a lot better since you have to do a bit of setup time in cold pressing (which should be done at least hourly in the beginning) and the lap takes a few minutes to get working well and that's when you will actually be doing the work on the mirror.
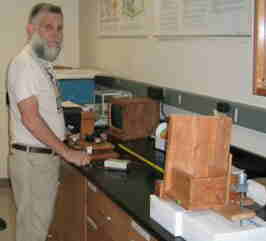 When you have polished the mirror and the pits are all gone from the surface, it's now time to see for sure what the shape of the mirror is. That's me in the photo settimg up to measure a 4.25" mirror. This mirror sits so low on the mirror holder that I put it up on boxes to make the alignment closer to the other larger mirrors that I test. If you're lucky, you will see a perfectly spherical mirror. If not, you will have something like a depressed or raised center compared to the rest of the mirror. Not to worry! A bit of looking at the surface will tell you what you need to do next. A depressed center that's less than the depth that you need for your parabolic surface then you're already started on making the proper surface. If there is a hill, then you will want to move further to the side when doing your strokes. The basic procedure in theory here is that holes (shorter radius in the center vs.. the edge) need center over center short strokes to eliminate it and hills (longer radius in the center vs.. the edge) need to have further offset strokes to rub the hills down. Remember that whatever is on top turns concave? It still applies here and is the basic rule of thumb of everything. Also, the longer the stroke, the more radical the difference between the center and the edge becomes.
After you have a fully polished out mirror and it sort of looks spherical and it's dimensions are within that of a paraboloid, it's now time to start the paraboloid strokes. These are similar to the coarse grinding strokes except that you still need to go slow like you did polishing. Take about 20-30 strokes and make at least 1 full turn around the tool while doing those strokes. Don't forget to turn the mirror a lot while doing this as you are probably quickly changing the shape of the mirror surface and you want to insure that you are getting a figure of rotation rather than an astigmatic shape. Put the mirror on the Foucault tester and check it for shape. You will probably find that the center radius shortened a bit and the rest of the mirror is still at the longer radius. This means that you now need to bring the mirror closer to the center of the lap and blend the radius of the center to that of the edge. The object here is to try and blend in the various radii that are tested for that make up the paraboloid surface. You will need to go from a overcenter stroke all the way to a large overhang stroke to get the desired surface. If you're not sure what's happening, don't be afraid to experiment as you are always able to get back to a spherical surface by a bit more of center over center polishing.
The unfortunate thing about figuring is that it is more of an art to do in a short order although intelligent inspection and remembering what you did to get there will help in figuring out what to do. If you go too far, it's not going to be a really difficult job to get back to a sphere again, just start doing the short overcenter stroke and it will hoprfully soon come back. You can then again start with the wider longer W stroke and don't go as far or as long the next time or you will merely end up in the same place. Better to sneak up on the final figure than try to get it all in one shot. Also, if you need to work on the edge, don't be afraid to turn the lap and mirror over so that the edges work preferentially to the center. This is often the better method of getting rid of a Turned Down Edge as you will work the near edge area and open the radius of the whole outer area to get rid of the TDE
Here is an example of what can happen when you do your figuring. This was on a very large mirror so it was a bit more complex than doing a smaller mirror. Smaller laps were made to work on only a small section of the mirror.
Have fun finishing the mirror and when you're done and have that 1/10th wave or better surface on it, you will be very proud of the mirror that you made yourself.
Before actually sending it out for aluminizing, you will want to put it in the telescope and do a bit of star testing on it. Dick Suiter's book on the subject is the bible of star testing. Yes, you can do an amazing amount of looking at the sky with a bare mirror. I have seen the double double split with a 6" uncoated mirror so go find some doubles and bright stars and check out the quality of your mirror. If you did everything well, you should have a superior optics that you will be proud of.
There are a fair number of places that you can use to have the mirror coated. If there is a place near you, that's probably the best place as the shipping time and possibility of damage is a lot less that way and you may even be close enough to be able to drive over there and thus not worry about the mirror getting broken by UPS. You can find a coating service in the back of Sky and Telescope or Astronomy magazines and you might also want to check in your Yellow Pages for such services. You may find somebody near you who hasn't been thinking of the amateur telescope market and thus might open up another coating firm to the hobby.