How to modify a Power Inverter to be a Drive Corrector.
Introduction
Making a drive corrector for driving a AC motor drive can be a bit of a problem for many. Getting together all of the parts to get the whole thing put together can be difficult as there's always something more that needs to be done and then, when you get it all together, is it done right? What is probably a better way is to use something that is already almost doing the necessary job and then adding in some little bit of circuitry and have the necessary thing you need. This page is going to show some of the techniques that I have used to modify various low cost power inverters so that I can use them as a drive corrector. The first thing to remember is that if you don't know electronics, go find a friend that is familiar with electronics to help you figure this one out as this article isn't going to be a pull X part from this point and replace with this part. Besides, if you don't know how to solder well, you will probably destroy the PCB while you are trying to remove a part. In addition, you probably don't have the necessary test equipment to be able to insure that the inverter is working right.
WARNING
Doing these modifications involve being around voltages high enough to kill you if you get them across you in the wrong way! Voltages of 180V are available in many of these inverters and they aren't protecting the customer from injury with any insulation after you open up the package. I might remind you that DC voltage grabs you harder than AC voltages do - it doesn't let go of you.
You are responsible for anything going wrong.
Test equipment like an Oscilloscope is a nice piece of equipment to have although a frequency counter can be used if you are aware of the limitations when testing a inverter. Also things like a synchronous motor will help if you don't have the other equipment and want to just check frequency of the inverter.
The 555/Transformer Design
The 555/Transformer type inverters use the 555 type IC to produce the necessary frequency signals to the driver circuits which drive a power transformer. The transformer is a large heavy transformer (a 140W unit weighs on the order of a pound and a half or more) that takes the 12V input and produces 120V output at the driving frequency thus the design is generally quite heavy and solid in it's design from the heavy transformer. The transformers are basically 12V transformers being driven backwards.
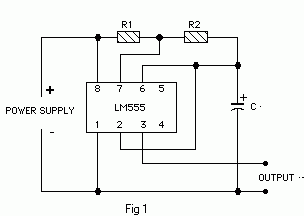
The 555 designs can be considered in two distinct styles, the single 555 which drives a full square wave to the drive circuit and thus the output ends up being a square wave at something that averages out to be about 120V. There usually aren't many parts in this design and there is usually an 8 pin IC which has the number of 555 somewhere in the numbers on the top of the IC.
The next is the modified sine wave design that uses two 555 ICs. Either this number or a 556 IC (this IC is actually two 555 ICs in one package) is used to produce the signal along with some other ICs. The first 555 IC produces 2x the frequency and the second one makes the shorter pulse each time the first one goes on that becomes the On time of the power output. The rest of the circuits in the inverter are used to actually generate the signals that go to the drivers and thus to the transformer. This basically is done by dividing the first oscillator by 2 and summing in the output of the second oscillator (which is operating as a pulse generator rather than a freerunning oscillator) which is actually the time that the output of the inverter is on. We won't be needing to concern ourselves any further with these circuits tho. What we need to figure out is which 555 IC is the one generating the frequency and modify that resistor controls that frequency. Figure 1 is the basic design of a 555 oscillator circuit. The resistor and capacitor are the frequency determining parts and since caps are rather difficult to change their values, the resistor becomes the changeable value of choice. What we want to do is find the total resistance of this resistor. Once you do find the resistor you want to replace it with one of twice it's value so that the 555 runs at half the frequency that it used to. Some run at 60Hz while others run at 120Hz so you have to check with the frequency before hand. If you get the wrong 555 circuit, you will merely change the on time rather than change the frequency. Generally the transformer will gracefully accept frequencies from about 10Hz to several hundred Hertz without problems. You might want to test for the right resistor by adding another one of the same value across it and the frequency will double. Please note that the 555 design modified sine wave signal may turn into a square wave but that is of no problems with the inverter.
 Once you figure out which resistor it is and have replaced it with one of twice the value, you want to make up your hand controller. The way this works is that when you want to go slow, you remove all of the resistance in parallel with the newly installed resistor on the board, the fast button puts a resistance of approximately 2/3 of the original resistance (the new resistor plus the switched resistor gives a value of 1/2 of the original resistor which means twice the frequency!) and when neither button is pressed, a value of approximately equal to the new resistor is across the new resistor value. This last needs to be made up of a pot which allows for about 10% of the resistance value and the rest as a fixed resistor to make up the rest of the value desired with the pot in the middle of it's range. Use a linear pot - there are other types of tapers available in pots, things like audio tapers and other names for them.
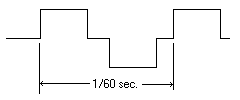 The modified sine wave 555 type inverters have the waveform shown at the right. The output signal consists of a positive and a negative pulse. Note that the voltage level is about +/-180V relative to the other side of the output. If you look at the input side of the transformer, you'll see one side go to ground and then the other side go to ground and the third wire to the low voltage side of the transformer will be +12V input. One of the 555 oscillators sets the pulse width while the other one sets the time between the pulses. There is other circuitry that sets the direction and drives the output circuits. When you change the frequency of this design, the two pulses (the positive and the negative ones) stay the same length but they get closer together and when you slow down the frequency, the pulses get further apart. What this means is that as the frequency gets higher, the pulses eventually run together but this is of no problem as the circuitry can't drive both of the output drivers at one time. For those of you that are in 50Hz territory, the frequency is, of course, 50Hz rather than 60Hz but the principals are the same.
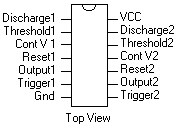
 Shown to the right are the 556 (right diagram) and 555 (left diagram) ICs. The ICs will usually have some letters in front of the number and some letters after the number. For example, one of the common letters in front of the number is "LM" and then there's also "CN" after the number. There's a lot of other combinations that are possible as many of the manufacturers put their own letters in front of or after the number. Please note that the number won't be buried in with some other number digits!
Hook the control up and test for the various frequencies and a good way to test for exactly 60Hz on the inverter is to compare the frequency against the line frequency by triggering the scope from the line and looking at the output of the inverter to see if the signal stays steady on the scope.
Resistor R2 may or may not be in the circuit shown above. It's purpose is to change the time period that the output is On vs. Off. I would suspect that most of the designs would not have such a resistor. The resistor would then be a short (0 ohms resistance) in such a case.
An example of a 555 design is here at this link.
The H Bridge Design
The H Bridge design is a newer design for inverters and can be easily recognized by it's light weight - usually on the order of a few ounces for a 140W unit. The design uses a 12VDC to 180VDC inverter to provide the intermediate step up of the voltage to another circuit which changes the high voltage to the 60Hz output. The form normally done is the modified sine wave. There are also full wave sine wave designs but they tend to be a lot more expensive (there's a lot more circuitry for the output to make the output a full sine wave) and we're talking about the cheap power inverters here.
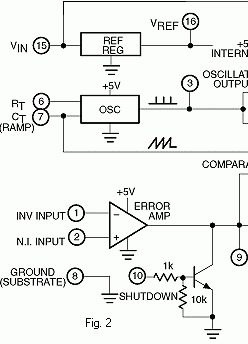
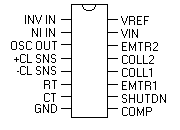 These H Bridge designs all have two SMPS controllers, one for making the 180V and the other to generate the output signal. The input of these designs needs to be left alone as it's only function is to produce the correct voltage for the following parts of the design. The input section is usually running at some frequency like 100KHz or such and that isn't what you want to change. What we are looking for a larger IC of 14 or more pins that is somewhat near the output section - there will probably be another IC near the input transformer and that isn't the one we want to deal with. This IC will have a bunch of numbers on it, usually in 2 or 3 lines. One line will be some letters and numbers while (usually the last line) will have a 4 digit number on it which will be the date code. The difficult thing here is finding out what the IC is that you actually have as the numbers can change. One IC that I have seen is the one that has "SG3524N" (partial drawing of the internals of this IC is in Fig. 2) This IC is an IC which is designed for this kind of purpose. One of the pins (on the SG3524 pin 6) has a resistor that goes to ground on it. This resistor is the frequency resistor and is what we are interested in. Putting a resistor of equal value in parallel with it should make the output go to twice the frequency as it is without the second resistor. Test and if you have the right resistor, you can then replace the resistor with one of twice the value as original and after that, the basic hand controller is the same design as in the above 555 design with the same selection of resistors from what the original resistor was. The thing to remember here is that the resistor can be of a wide range of values depending upon the desired frequency and these ICs are designed to work at frequencies up to 100KHz or so and 120Hz is a fairly low frequency for them.
A very easy way to find out what a particular IC does is to plug the number into Google and see what data sheets come up. If you know the logos for the various IC makers, you can also put in the company and get their data sheet. I'll also note that the part number may incorprate the manufacturer's initials at the front of and the package design (what type of mechanical package that the IC is in) and a temp range at the tail of the part number. Note the above SG3524N, the part in particular is made by Silicon General and that the N on the tail is the code for the dual-inline package. Other makers may put a different set of letters in front of the number. I'll also note that not all companies use the same numbers for their version of the part. Another part number that I've see has been the TL494 which seems to be a slight variant of the 3524 IC.
The output waveform is the same as for the modified sine wave 555 design but the circuit keeps the pulse width the same relative to the frequency so it's always going to look the same irrespective of the frequency that it's running at. As a result, the signal will always have the same relationships as it does at 60Hz.
It must be noted here that there are other ICs that can be used for this job so if you have any strange ones, you might want to check at a chipdirectory website to see what the IC is. There are a lot of ICs and they do all kinds of things. Innovative engineers have figured out some strange things to do with some of the circuits inside of the IC. If you have a problem, contacting a friend that is familiar with electronics will help you along very nicely and if that's no help, I'll always be interested in adding that IC to this page.
A Design for the Hand Controller
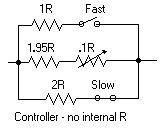 The general form of the hand controller can be of several different varieties. The diagram to the right shows what the typical form of a controller should be. The values listed in the diagram are relative to the actual value found in the inverter for the frequency control and the values are for a permanently connected hand controller to the inverter.
If you decide to make the hand controller removable, you have the choice of using a shorting type connector (audio connectors are one good choice) so that when the plug is pulled out, there is a resistor shorted across the two leads of the value of the original resistor so that the inverter. at the least. keeps on going. With the 555 type inverters, this is the better thing to consider because the power going through one side of the transformer may eventually overheat the transformer and cause problems.
If you plan on leaving a 2R resistor into the original resistor's location (a better design), you will want to change the values so that they will produce the same end result. For calculating these values, the thing to remember is that you want to get in the end the .5x, 1x and 2x of the original resistor value to get the right frequencies out of the inverter.
General Notes about Power Inverters
I've found this much info out by looking at the various inverters that I have bought and converted over the years. This means that I've determined the ICs that were on the boards inside and have looked at the functions of the parts at such places as ChipDirectory and the manufacturer's data sheets. With the advent of the World Wide Web, such things have become a lot easier than having to get the appropriate book and look through the data sheets for any info that is available. Please note that the IC may not be used in the same way that the manufacturer has shown in their data sheets (the SG3524 is a case in point as it is designed for something a bit different than exactly the way that it's been used in the inverter design) so you basically have to ignore the differences and find the frequency setting section of the circuit and see if your inverter has the same parts in that area. Usually the frequency components are the same and the formulas that are given in the data sheet is the same as what is needed if you feel the need to calculate as opposed to just play with.
I've bought the 100W size inverters for as little as $20 and even these little ones should be just fine. The power consumption of a synchronous motor is about 6W or so and as a result, the inverter will be lightly loaded.
If you are using a charger for a laptop, you should be able to use that in parallel with the driver corrector as those are almost all lightweight switching power supply units that use a switching power supply that will accept the 30Hz - 120Hz without any problems but they may temporarily (while the frequency is way off) stop charging the laptop at the full rate.
Experimentation is the only real way to find out if everything works and with the output voltage of an inverter set at the acceptable level for a battery charger, the probability of damaging something is very low. I suggest that you use a small lamp as a load while playing with values as it's kind of hard to actually destroy a light bulb and if you do, it's not very expensive to get another. The little 12W decorative lamps are probably the nicest as they won't be blinding you as you work.
Recently I've seen some 140W inverters available for $25 at a surplus place but who knows how long those are going to last. Most of the inverters are so small that some may want to just put the buttons and pot right on the inverter and you can do this but remember to make sure that they don't touch anything inside and that you'll be handling a much heavier power cord(s) than if you put a sperate box on a nice thin leash to the inverter.
I've also had some correspondence with individuals about the chips in the various inverters. I'll note that some manufacturers use inhouse numbers (the IC makers put a strange number on the part as either an attempt to obscure what the IC does or just to allow the manufacturer to simplify their catalog of parts used on the products) on their parts so some sleuthing may be necessary to find out what the part really is. I'll also note that often the same part may be used in two different locations (they are switching regulator controllers) for the input 180V regulator and for the output controller. Make sure that when you start messing with one, that it is the right one. Generically, if the IC is near the input 180V transformer then it probably is the 180V regulator and if it is near the output transistors then it is probably for the output circuit which is the one that you want to deal with. In addition, there may be a part like a large cap bent over the IC hiding it so do a good job of looking over the PC board, even looking on the bottom as it is quite easy to put parts on the bottom of a board.
Good Luck!