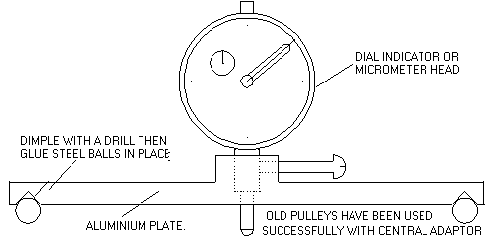
Don't be put off by this master craftsman's impeccable designs and technique. You can often achieve results just about as good with a more relaxed approach. For example, an enterprising ATM can simplify Texereau's three-ball ("triangular") spherometer, by cutting a triangular plate of 1/8" or 3/16" thick aluminum, carefully locating the positions for the balls on an equilateral triangle (as large as feasible for your lens size), marking them with a punch, drilling dimples into the metal, and then epoxying large ball bearings into the dimples. Next after finding the center of the triangle carefully (remember that the perpendiculars to the lines between the balls will intersect at the center of the circle!), drill a hole and mount a micrometer screw or dial indicator reading to 0.0001" or 0.001mm. Less than this level of accuracy is not enough for a spherometer. The micrometer screw or dial indicator (your choice as either works very well) should be tipped with a ball attachment rather than the normal flat end.

| A, B, C | are the distances between the centers of the 3 balls. |
| q | is a partial answer for the next equation. |
| R | is the radius of the spherometer's three points upon which it rests. |
This formula will determine the diameter of the spherometer accurately and you do need to measure to the nearest .001" for best results. When measuring from the top of a ball, it's better to measure between the balls and then add in 1/2 of the diameter of the ball rather than trying to figure out where the center of the ball is.
The point here is that while TEX gives you perfection in construction, you can live with somewhat less. So be inventive, but keep the goal in mind. And remember that f/15 achromats are forgiving. Be careful, but don't despair. I'm not a machinist, but I managed to build a 6" dia. three-ball spherometer out of aluminum with hand tools and a table top drill press some years ago. It works great and achieves an accuracy near the limit of 0.0001". The cost was under $100 and I've used it on many successful lens projects. Texerau tells you how to make a reference flat for your spherometer from 3 Pyrex mirror blanks. I've also done this and it works great. Just follow his technique.
In order to use your spherometer, you need to calculate the "sagitta" (pronounced "sa-JIT-a," though opticians say "the sag") of your surfaces. This is a measure of the depth of the curve you are shooting for. The sagitta formula is as follows:

| R | is the radius of curvature of the surface you're making |
| d | is the diameter of the three balls that make up the equilateral triangle of your spherometer in a "triangular" spherometer (the ball on the indicator's tip doesn't matter) |
| r | is the "spherometer constant" - the radius of the spherometer 's support ring. This constant is the distance from the center of the micrometer ball to the average center of the feet. It can be obtained by the equations above, or it can be measured carefully with a machinist's caliper, or if you know accurately the radius of another optic, say a mirror, you can use the spherometer formula above to deduce your "spherometer constant" by working backwards. First measure the mirror's sag with your spherometer, and its radius of curvature by the knife edge or Ronchi test, then plug in the known values and derive r from them. |
In order to complete this calculation and to use the formula in general, you need to understand the term +/- d/2. The d/2 itself is just the linear radius of your ball-feet; generally it will lie somewhere between 1/8"-1/2" depending on the balls you make your spherometer with. This quantity is taken as positive (i.e. + d/2) if your optic surface is CONVEX, and negative (i.e. -d/2) if it is CONCAVE, In other words, say you have a spherometer of a 5" diameter with balls of 1/2" diameter and want to fabricate the R1 or your Fraunhofer lens. Then your spherometer constant will be something like 5"/2 = 63.5mm. for the radius of the spherometer. Let's take the radius as being exactly 63.5mm (you should, of course, accurately measure or deduce what it really is) . R1 is convex, then its sag as measured by your 5" spherometer will be calculated as:
If the surface had been concave, the measured sag would be 1.479mm. By convention, when you use this formula you take the absolute value of the radius of curvature ignoring any negative sign. For more information on spherometry and spherometers, see A. Mackintosh, "Advanced Telescope Making Techniques," vol. 2 (Willmann-Bell, 1986), pp. 95-99.
So now you must calculate the sagittae for all four surfaces of your lens and record those numbers somewhere safe, where you can consult it whenever you need to for each of the surfaces.
| Go to Another place | ||
|---|---|---|
| Previous Page | Index Page | Next Page |