Notes on making Spherometers.
 A spherometer is a measuring tool to measure the radius of a curved surface. They do this by measuring the difference in height between two different points on the surface. Baiically they are using hte chord of an arc and measuring that chord to the arc at the midpoint between the two ends of the chord.
I have found spherometers to be a very useful tool for optical work and this is an article on the methods that I've used to make several of them. Most of the ones that I've made
have been the round 3 leg spherometers with the legs at the 120 deg. angle between.
A spherometer is a measuring tool to measure the radius of a curved surface. They do this by measuring the difference in height between two different points on the surface. Baiically they are using hte chord of an arc and measuring that chord to the arc at the midpoint between the two ends of the chord.
I have found spherometers to be a very useful tool for optical work and this is an article on the methods that I've used to make several of them. Most of the ones that I've made
have been the round 3 leg spherometers with the legs at the 120 deg. angle between.
These are the nice stable spherometers that you can just sit down on the surface to be
measured and then read. A variation of the 3 leg spherometer is the ring spherometer which has a continuous ring all the way around, These are slightly better as you can measure up to the edge of a surface with the measuring probe. The difficult part about them is that you have to make all of it on the lathe which many people don't have.
The first one that I made was a 3" diameter one that could also be converted to
1.5" one if needed.
After building a 3 leg round spherometer, it is always wise to actually measure the 3 legs
and figure out the actual diameter that the leg's points are on. When you are doing a spherometer by the 2 legs with or without the side third leg, you merely need to measure
between the tow legs to determine the diameter.
I'm going to describe the several different spherometers and give generalized drawings on
how to build each.. Please note that I'm not going to put dimensions on them as it can be a bit difficult to give the optimum measuring circle for you. You have to determine that for yourself. Rather, I'll give some dimensions for some of the things as a general guide to sizes of stock and so forth so that you don't build one that is flimsy and not usable.
The first thing for any of these spherometers is to figure out what size you want to build.
Second is to find a dial indicator that reads to 0.0001" accuracy. These are going to be the more expensive dial indicators and often they will have only a 1/4" range
although you can find ones that do up to an inch in range at a higher cost. I'll also note here that you don't want to use a digital indicator as these won't show trends and roughness noise in the readings. Better to use a dial indicator of only 0.001" accuracy as it will at least bounce about and indiacate how accuratey you can trust the surface reading could be.
Before you get started with the various versions of the spherometer, you will need to make some parts that will be common to all of the spherometers., the legs and a clamp for the dial indicator.
Making the legs.
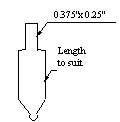 Chuck up a bit of 1/4" rod in the lathe chuck. Start by spot drilling (spot drills are those funny looking drills that have a little point on a larger shaft and a 45 deg. angle between
the point and the shaft) the end of the rod. Use a small one so that the ball that you put there won't fall into the hole. Then turn a angle (45 deg. is fine) followed by the distance you want to have the plate above the flat surface defined by the balls. Finally turn a portion of the shaft to 3/16" 1/4" long; to mount the leg into the plate. Last is to cut off your leg and do it all over again for the next leg.
Chuck up a bit of 1/4" rod in the lathe chuck. Start by spot drilling (spot drills are those funny looking drills that have a little point on a larger shaft and a 45 deg. angle between
the point and the shaft) the end of the rod. Use a small one so that the ball that you put there won't fall into the hole. Then turn a angle (45 deg. is fine) followed by the distance you want to have the plate above the flat surface defined by the balls. Finally turn a portion of the shaft to 3/16" 1/4" long; to mount the leg into the plate. Last is to cut off your leg and do it all over again for the next leg.
When you make the length above for the length of the leg, figure out how deep a convex
surface you are going to measure and also how much of the dial indicator is going to have
to stick out beneath the plate.
Finally, take your legs and silver solder some small ball bearing balls to the feet, putting
them into the hole you drilled. The smaller the ball you can find, the smaller the ROC you can measure without having to take into consideration the diameter of the ball in the
calculations for the ROC of the surface you are measuring.
At this point, your legs are finished.
Another mounting for the legs is to drill and tap the top of the leg for a bolt and use that to hold the leg in place. This method I don't like as much as you need to turn the top part
of the leg accurately so that it just fits into the hole with a snug fit and that takes some fiddling if you aren't a good turner.
Dial indicator clamp
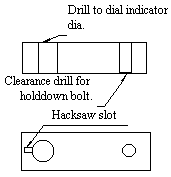 Next for all of the spherometers is to make up a clamp for the dial indicator.
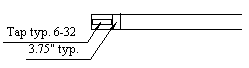
Take a piece of the 1/4"plate and form it into a rectangular piece. Drill a bolt hole towards one side of it, a hole for the shaft of the dial indicator towards the other end and
then drill a hole through for the clamping bolt. I usually use a 6-32 Allen head bolt for this bolt. Hacksaw a slot through to the hole for the dial indicator and finally clearance drill one side of the resultant legs and tap the other side for the bolt.
You are now finished with the clamp for the dial indicator.
3 leg spherometer
 This spherometer is usually done on a lathe from a piece of plate. I prefer to use
1/4" aluminum plate for my spherometers as it is easy to work.
This spherometer is usually done on a lathe from a piece of plate. I prefer to use
1/4" aluminum plate for my spherometers as it is easy to work.
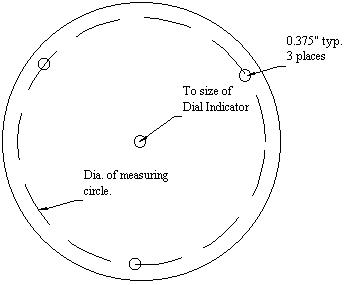
First put a 1/4" hole in the center of the 1/4" piece of plate in the center (you don't have to be exact as the plate will be turned round on the lathe) and put a bolt through it that is long enough to reach to the back of the chuck's jaws and have a nut on it. Chuck the bolt shaft up with a nut on the threads (not on the nut) and then tighten the nut so that the plate is held against the chuck jaws by the bolt and nut and then tighten the chuck against the bolt. Start the lathe work by turning the plate round.
After you have the plate round, I usually take and do a little groove to define the diameter of the circle that I want. This is done by using a 60 deg. bit and taking a very light cut on
the plate and then pulling the bit back and measuring what the diameter is. If it's not right then I adjust the cutter position until I have the right diameter and when it is right, I then
take a cut down about 1/8" or so to define the circle.
At this time, you can face the bottom of the plate if you so desire to make it look good. If you do that, you can then turn the plate over and face the other side as desired.
 Finally, you can finish up the plate by drilling the center hole to just clear the dial indicator
and drill and tap the hole to hold the dial indicator clamp. Best way to do holes like the clamp holddown is to put the clamp onto the plate and start your drilling with the clamp in
place and then finish with the clamp off. Clearance drill the clamp at this point and tap the hole in the plate.
Finally, you can finish up the plate by drilling the center hole to just clear the dial indicator
and drill and tap the hole to hold the dial indicator clamp. Best way to do holes like the clamp holddown is to put the clamp onto the plate and start your drilling with the clamp in
place and then finish with the clamp off. Clearance drill the clamp at this point and tap the hole in the plate.
Last thing to do is to drill and tap for the 3 clamping screws for the legs.
 Assemble by putting the 3 legs in and putting setscrews in there to hold the legs. Then apply the dial indicator clamp with a bolt and finally put the dial indicator in and clamp it in place. If you did everything right, everything will fit just right.
When you are done, you need to measure the distance between the balls centerline and apply the formulas 1 and 2 (to the right) to find the radius of a circle defined by the balls. This defines the actual circle for the spherometer and is needed if you want to hav an accurate pherometer.
I generally put the two formulas for finding the ROC and the sagitta (formulas 3 and 4 to the right) on the spherometer with number punches with the value of the radius of the spherometer (r acutally I put the value of r2 there) already in the formula. This will keep you from losing the number and will also keep the two formulas ready at hand. These formulas are actually the approximate version of the formulas as, if you use small balls, the difference between the exact version and the approximate version is well within the measurement of the value of S.
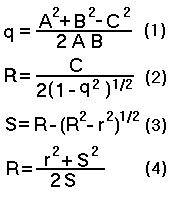
For reference, the definitions of the symbols are as follows:
- R is the Radius of Curvature of the surface being measured.
- S is the Sagitta of the surface, positive being concave, negative being convex.
- A, B, C are the three measurements of the distance between the ball centers.
- r is the radius of the measuring circle.
Ring spherometer.
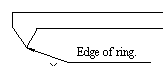 The ring spherometer turning is started basically the same as the the 3 leg spherometer. It's problem is thta the ring needs to be fairly sharp at the edge or the ring will measure differently for concave and convex surfaces.
You do need to use a thicker plate as you are going to remove a lot of material so that you can measure convex surfaces with it. I'd use at least 3/8" plate for this as I'd like to have at least 3/16" thickness on the disk when all is done. Larger spherometers may want more thickness than even that.
After you have hogged out the center area, finish up the ring by turning the edge material at a 45 deg. angle to form the ring. Adjust the final cuts by measuring the diameter of the
peak of that ring and try to hit a nice even number.
Finish the top of the plate if desired and then open the center hole for the dial indicator and finally do the mounting for the dial indicator clamp.
Mark the formulas as indicated above and you are done with this version.
2 leg spherometer.
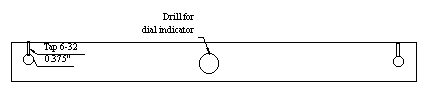 This spherometer is really the least accurate one as it is easy to tilt the spherometer and lose accuracy. It, however, is probably the easiest to build and can be made without anything but hand tools.
Start with a piece of bar stock long enough to do all of the holes and so forth.
Mark a line on a face of the bar to which all of the 3 holes are going to be drilled to. I would prefer to use a 1/2"x1" bar for this one and mark the line on the 1" face. Mark off for the dial indicator at the center of the bar and then 2 more marks at the radisu desired for the spherometer. Carefully drill (spot drill definitely make the proper positioning of the holes a lot easier!) the three holes.
On this spherometer you can dispense with the dial indicator clamp if desired and just use a third hole sideways through the bar to clamp the dial indicator to the bar.
Apply the legs and accurately measur the distance between the balls and mark the bar with
the formulas with that number included and you are done.
2 leg spherometer with an outrigger.
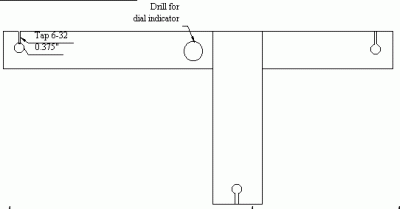 This is a modified version of the 2 leg spherometer where there is an outrigger to hold the
spherometer into a known angle.
This is a modified version of the 2 leg spherometer where there is an outrigger to hold the
spherometer into a known angle.
Start by building the bar for the 2 leg spherometer. After you have that done, you make up another shorter bar which will go out from the side of the 2 leg spherometer and
support the spherometer upright.
Next thing you want to do is a lap joint for the third leg. This is best done on a mill but you can still do excellent work with a hacksaw and file. A snug fit is very desirable but you can get away with some slop here as the lap joint itself isn't going to be controlling the position of the third leg. Drill and tap 3 holes (do one at a time and you won't have to worry about alignment of the 3 bolts) to hold the outrigger in place. Finally drill the holes needed for the third foot at the radius of the circle.
Finally mark the formulas on the bar so that you don't lose the radius of the spherometer
and also have the formulas at hand when you are using the spherometer.
This is the easiest of the accurate spherometers to build and will do good service.
Modifications to the spherometers
One of the midofications you can do to the spherometers is to drill for a second diameter
of the spherometer so you can use it on smaller pieces of glass. Unfortunately, you can't do this with the ring spherometer.
When you drill for the setscrew clamp for the legs, drill deeper to the second set of holes so that you can get to them with the setscrew. I drill just past the hole so that the spacer that wil go in there to clamp the inner location has a place to stay.
On the 2 legged spherometer, you just need a second set of holes without any need for the
spacer as you have access to the side of the bar.
With the 3 leg spherometer, after you have all of the other work done, make a set of spacers which will apply the force from the setscrews to the inner hole. When using the
inner holes, you merely undo the setscrew and lat the spacer fall out from the center of the
spherometer and then tighten up when the leg is in the inner hole.
Hope that this article describes all of the details that you will need to make your own
spherometer. I have found them easy to make and they have been very useful in all of the optical work that I've done. If you do a good job with the spherometer construction, you will have made an excellent instrument that will last you a good long time.