Notes on a Small Spindle for Glassworking up to About 6" in Diameter.
Many people have been thinking about doing their grinding and polishing work by power rather than by hand. This article describes a little spindle that I made up to assist me with working with small lenses. I had planned on doing eyepiece lenses with this spindle and using hand tools to form the glass. However, as I've been working along, some larger work has come first. The first was a 4 1/2 inch mirror and that worked well with little loading problems. Then came along a 6 inch doublet lens kit. I mounted a larger disk on the motor shaft and then promptly ground and polished all the surfaces for the lens without any problems. As a result, I decided to pass on this cute little thing to all of you out there.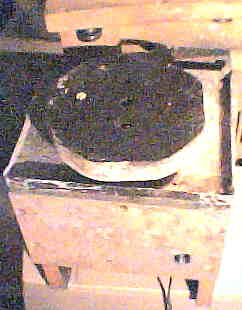 The first thing that I did was find a DC motor that spun a geared down shaft (shaft is 3/8" diameter) at about 60rpm at the rated voltage. The motor in question was obtained from a local surplus shop so I really can't tell you what model it is. The motor draws less than 1 amp at 24V and that is about the amount of power (25W) to about twice that for decent results. The most important thing with the motor is that the geared down shaft be good and sturdy. There will almost always be some kind of mounting on the gearbox and most of them are to a flat panel that the shaft goes through.
I built up a small stand for the whole thing from some wood laying about. The motor is mounted on a shelf slightly lower than the top of the stand and did some grooves so that the shelf will stay in position firmly.
A pan made from some sheetmetal to protect the stand and the motor was then hammered out of a piece with a small hole in the middle and the edges turned up and th corners folded together and applied to the stand. When you do the hole in the pan, don't forget to make sure that you do a good turned up section by stretching the metal so that there won't be any stuff dropping down onto the motor or the shelf inside the stand. You will also note a pushbutton switch on the lower right of the front panel so that the motor can be turned off without reaching very far.
 The motor that I got had a 10-32 screwthread in the end which made an easy job of mounting things to the shaft - all I had to do was provide a steel plate that I could mount something else onto and I was there. Under the black coated round thing in the image above is a steel plate that is 1/8" thick and approximately square with holes for mounting the plate to the shaft and several more to mount a piece of wood to the plate. All it takes is a single bolt hole through the wood to mount the assy. to the shaft.
If you are wondering about how to make sure that the top surface of the wood is flat and aligned with the shaft, the process that I use is to apply the wood to the spindle and then saw it as the spindle turns and thus you will get a flat surface that isn't going to wobble as it turns! The turning of the wood as you do your cutting insures that the top will also be nice and flat as the saw is cutting in all directions on the wood. Cutting the wood into a circle is best done before you apply it to the spindle on a table saw or with a router. You will notice that I just cut the piece into an octagon rather than fully turning the piece. The black stuff on the top of the wood is cheap spray bed lining from a spray can. That stuff is strong enough to hold the glass or tool on top of the wood but weak enough that you can pry it off when it comes time to. If so desired, you can do a full three point clip setup on the top surface but the 6" glass is so large that clips won't work in this case.
Also note that I put a ball bearing at the top of the stand to provide some side bearing support to the shaft in the photo. 3 clips hold in into a stepped hole very nicely. If you get a motor with a smaller shaft, it should be no problem to provide a larger shaft that you clamp to the original shaft coming out of the gearbox (recommended so that the mounting point at the top of the spindle is more rigid) if you desire so and put a bearing at the top to take the side forces so that the gearbox doesn't get abused by sideforces. The bearing hole was done by drilling the outer hole with a spade bit to a depth of almost the thickness of the bearing and then drilling the center part of the hole where the shaft comes through with a smaller spade bit using the guide hole from the larger bit. Also note that finishing the hole from the other side of the piece will keep things from splitting out as you finish the hole.
Also note that the front panel is only screwed to the rest of the stand so that the motor or other stuff can be accessed without problems.
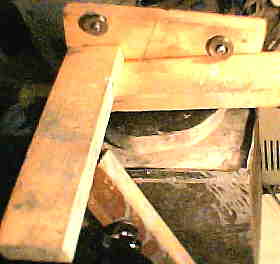
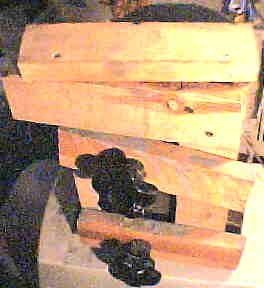
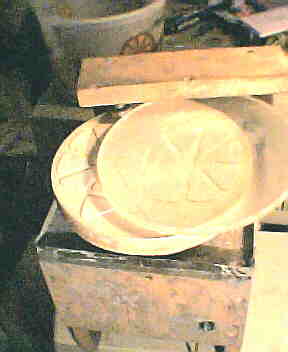 Next thing that came along as I was doing the initial grinding of the glass was that I could hold my fingertips in a particular location and the glass would spin on top of the tool all by itself. As a result, I quickly stopped work and made up an arm to go over the top and hold the glass in place so it doesn't fall off of the tool. I don't know if there is a name for an overarm in this form but it does work very nicely. The image at the top left is what the underside of the overarm looks like. The image on the right is what the clamping system looks like on the backside of the stand. All of the wood used here is 1x lumber so you have an idea of how big this stuff is. The image at the right below is a 6"lens on the spindle with the arm in place and holding the glass from falling off. Note that in this spindle, looking down on the spindle, turns counter-clockwise so the glass is being driven onto the arm as the spindle turns. I used some spray-on bedliner for a truck (that is what I had available for a low strength adhesive) to attach the various tile tools to the top of the wood. The only problem with using that stuff is that it takes a day for it to dry and provide good adhesion but that is an overnight thing that can be done without problems. Get the cheap stuff that is in a spraycan at the local auto parts store for the bedliner.
The power of the motor is rather low (twice or even a bit more power would be nice but I'd worry about the forces involved if there was a problem with the glass to tool sticking) so just letting the glass turn without any additional weight above it is about enough. The spindle does have enough power tho to do some damabe to glass if it throws it off tho. The nice thing is that the spindle is doing the work so you can just set back and watch it go, applying some finger pressure if you really want to. If I really had the desire, I'd make up a weight of about 5lb. and put some suckers on the bottomside of it and set it on the glass. Just placing something on top will quickly throw it from the top of the glass.
One of the things that I like about this little tool is that it is fairly light and unobtrusive so it doesn't fill up the corner of a room like other much bigger machines do. The power may not be huge but it is successful in doing 6" glasswork.
Future projects would probably be a real pan to hold back the grit and water that get flung off of the tool as things turn. Next may end up redoing the arm so that I can polish both sides of the glass at the same time which is something that would be nice for lenswork. Another would probably be to paint everything glossy so that grit doesn't stick to it so well.
This machine has done a wonderful job of just taking the monotony out of grinding for me and will be well used in the future. I was amazed at how nicely the stationary offset actually did work with making things spherical. Even polishing was done without problems.